Attributes
Attributes Overview
The attribute fields can have various settings. For example, attributes can be mandatory or optional. They can be visible as soon as a form is opened or appear later, based on the user's selections. They can require the user to enter a value or to select a value from a predefined list or a list retrieved from the database. The attributes' behavior can be controlled by JavaScript.
For example, the Place attribute in the Employee Travel form is mandatory, of type Free text, and appears empty on a ticket.

The Webex Meeting # in the Webex Recording form is mandatory, of type Numeric, and appears empty on a ticket.

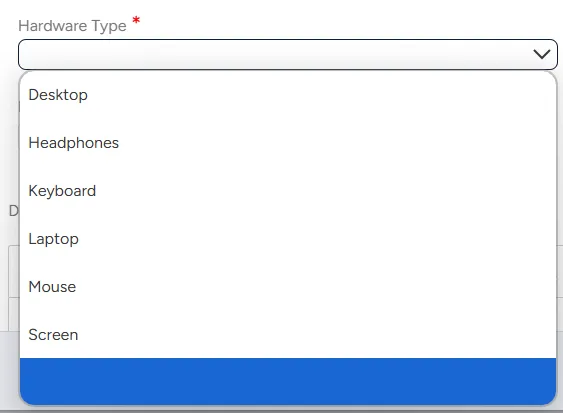
The Hadware type attribute in the New Hardware form is mandatory, of type List of Values, and appears empty. The user can choose a value from a predefined dropdown list.
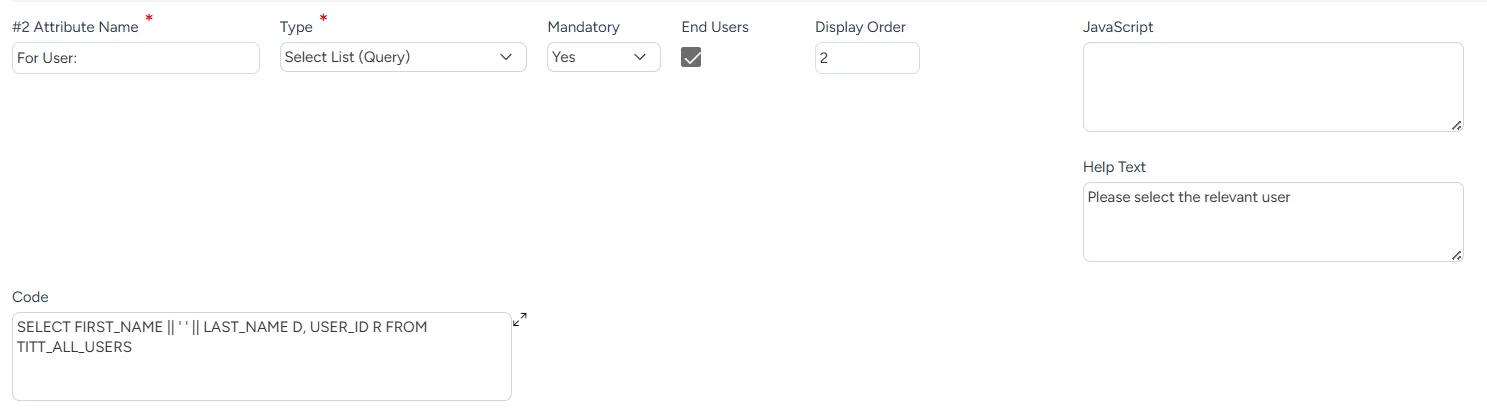
An example of an attribute using values retrieved from the database is For User, of type Select list (query), in the Access to Nework Folder form, which displays all users and allows selecting a specific user.
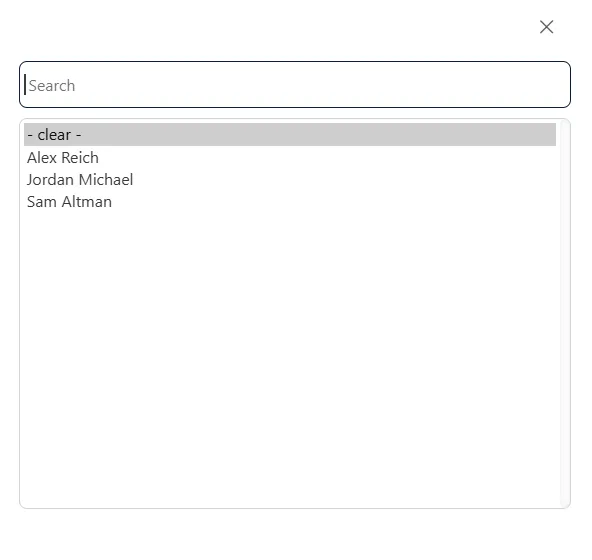
For the user, this attribute can appear like this:
You can use JavaScript to control an attribute's behavior based on user input.
For example, you can set an attribute to appear or to be populated by specific values only when the user makes a particular selection on the form.
In the following example, when attribute 4 changes its value to “Other” then attribute 5 is shown; otherwise, attribute 5 is hidden.
In the following example, an error message is displayed if attribute 2 does not contain 9 digits.
Attribute Types
A new attribute you add to a ticket form can be of the following types:
Type | Description |
|---|---|
Free text | Enables entering a text value |
Numeric | Enables entering a numeric value |
List of values | Enables selecting one value from a dropdown list of values |
Date | Enables entering a date |
Date with time | Enables entering a date and time |
Simple Y/N checkbox | Enables selecting either Yes or No |
Text area | Enables entering a paragraph or multiple paragraphs of text |
Select list (query) | Enables searching for and selecting one value from a list of values retrieved from a database using SQL code |
Hyperlink | Enables adding a hyperlink |
Multiple select LOV | Enables selecting multiple values from a dropdown list of values |
Multiple checkboxes | Enables selecting multiple values |
Multi select list (query) | Enables selecting multiple values from a list of values retrieved from a database using SQL code |
View only | Displays information; cannot be edited by the user |
Setting up attributes
You can set up attributes at any time. From the Forms Setup page, you can:
Adding or editing an attribute
You can add a new attribute to a form or edit a form's existing attribute at any time.
To add or edit an attribute:
On the Forms Setup page, from the tabs at the top, select Attributes.

To add a new attribute, at the bottom of the list of attributes, select Add a New Field.
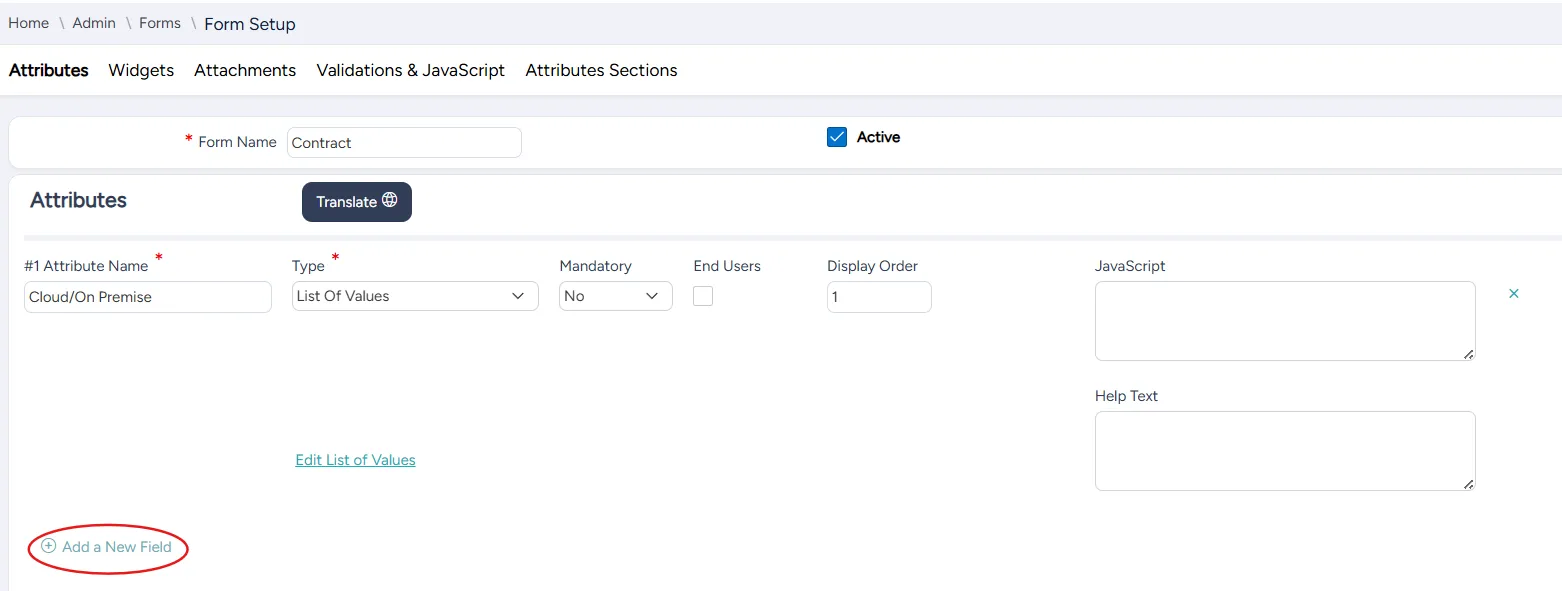
Enter or select values for the following fields:
Field | Description |
|---|---|
Attribute Name | Enter a meaningful name for the attribute |
Type | Select the attribute type
|
Mandatory | Select:
|
End Users | Select to make the attribute available to end users |
Display Order | Enter the attribute's consecuitive order on the form |
JavaScript | (Optional) Enter JavaScript to control the attribute's behavior with JavaScript |
Help Text | Enter the attribute's Help text |
At the bottom right of the page, select Save.
Disabling or deleting an attribute
The attributes in the form remain in the order they were added. The last attribute added can be deleted completely. If an attribute is not the last, it can be disabled.
To disable or delete an attribute:
From the tabs at the top, choose Attributes.

To delete the last attribute in the list, select x in the last column. The attribute disappears from the list.

To disable an attribute in the beginning or middle of the list:
- Clear the Attribute Name field.
- In the Mandatory field, select No.

At the bottom right of the page, select Save.
Using List of Values (LOV)
Several of the attribute types require the user to select a value from a list of values. They can be classified as follows:
| Predefined values | Values retrieved from the database based on an SQL query |
|---|---|---|
Single selection | List of values | Select list (query) |
Multiple selections | Multiple select LOV | Multi select list (query) |
For any attribute of the type List of Values, you can use a unique list or you can use a shared list that is also used elsewhere.
Using a List of Values with predefined values
When using an attribute of the type List of Values (LOV) or Multiple Select LOV, you can enter the list manually or use a shared List of Values.
For a List of Values retrieved from the database, see Using a list of values retrieved from the database.
When a user opens a ticket with this attribute, the List of Values appears as a dropdown list. If the attribute is of the type List of Values, the user can select one value from the dropdown list. If the attribute is of the type Multiple Select LOV, the user can select multiple values from the dropdown list.
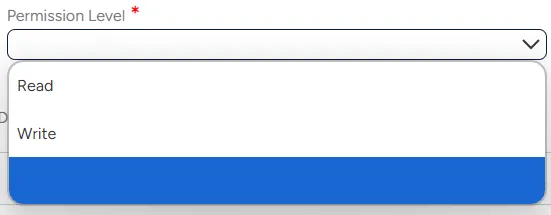
For example, in the following figure, the user can choose a permission level from an LOV consisting of two values: Read and Write.
Adding, updating, or disabling a manual List of Values
For any attribute, you can add, update, or disable a manual LOV at any time.
To add, update, or disable a manual List of Values:
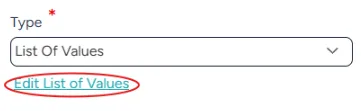
After you select List of Values or Multiple Select LOV as the attribute's type, click on Edit List of Values.
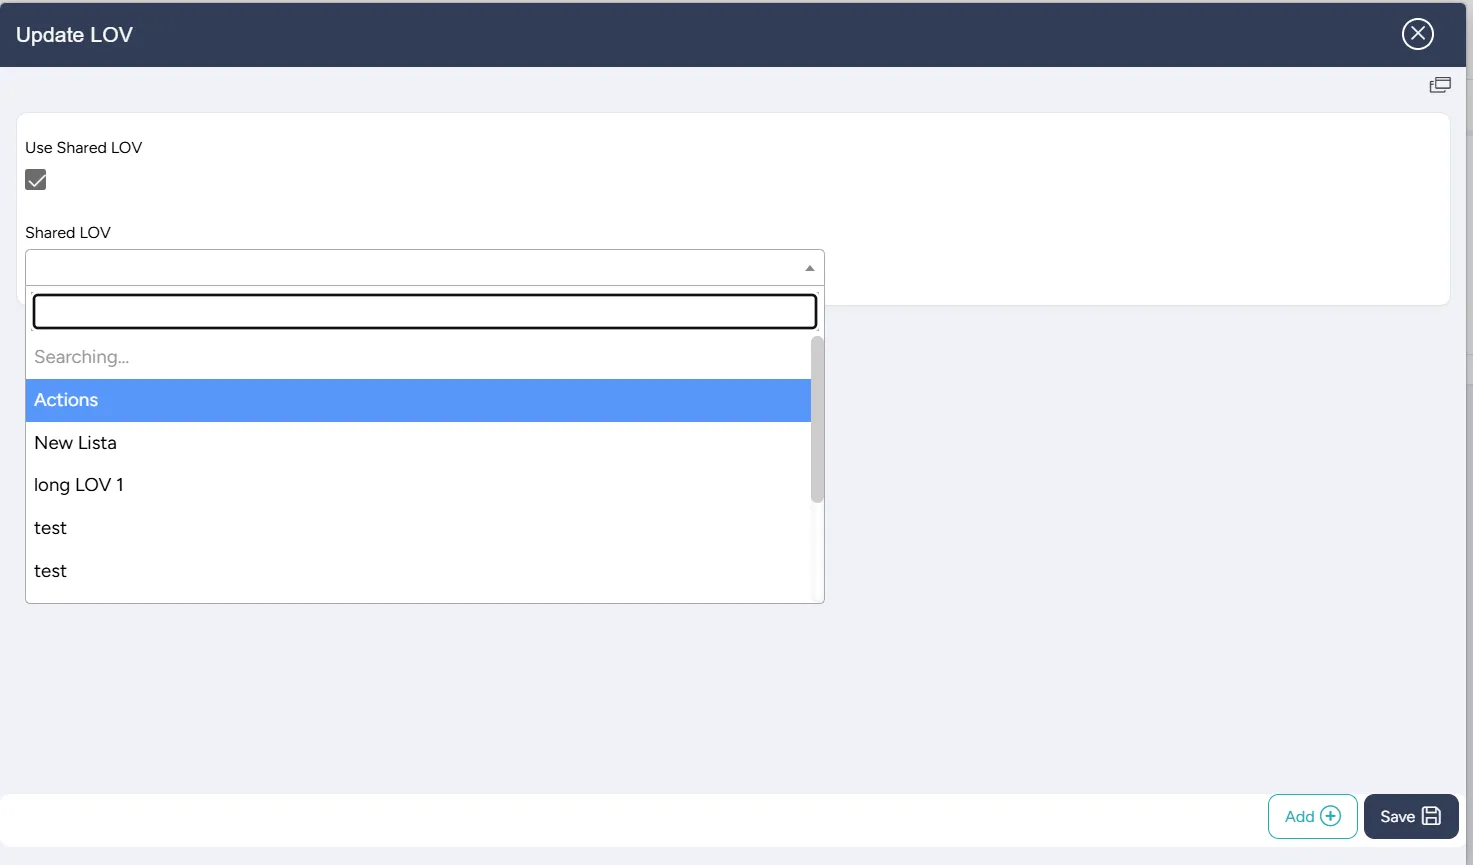
In the Update LOV dialog that opens, you can:
- Use an existing shared List of Values by selecting the Use Shared LOV checkbox and then selecting a List of Values from the dropdown menu that appears. (See Using shared List of Values.)
- Add a value by selecting Add and entering into the new row that appears at the bottom the new value's Displayed Value, Returned Value, and Disabled Date (optional)
- Update each existing value's Displayed Value, Returned Value, and Disabled Date (optional)
- Disable a value by setting Disabled Date to today's date

Select Save and close the Update LOV dialog.
Using a list of values retrieved from the database
When using attributes of types Select List (Query) or Multi Select List (Query), you retrieve all possible values of this attribute from the database using an SQL query.
For example, if you want your attribute to enable the user to select an agent from a list of all agents currently active in the database, you can use the following query:
When a user opens a ticket with this attribute, it appears like a dropdown menu:

When the user clicks on the dropdown menu, a searchable dialog with all the options retrieved from the database pops up. If this is a Select list (Query) attribute, the user can select one value from the list. If this is a Multi Select List (Query) attribute, the user can select multiple values.
Adding, updating, or disabling a database-based List of Values
For any attribute, you can add, update, or disable a database-based LOV at any time.
To add, update, or disable a database-based List of Values:
After you select Select List (Query) or Multi Select List (Query) from the Type dropdown menu, enter new SQL code or edit the existing SQL code in the Code textbox.
You can also enter or edit the SQL code in the optional next step.

(Optional) If you want to validate your query:
Click on the expand button to the right of the Code textbox.

In the Validate SQL Code dialog that opens, select Validate.
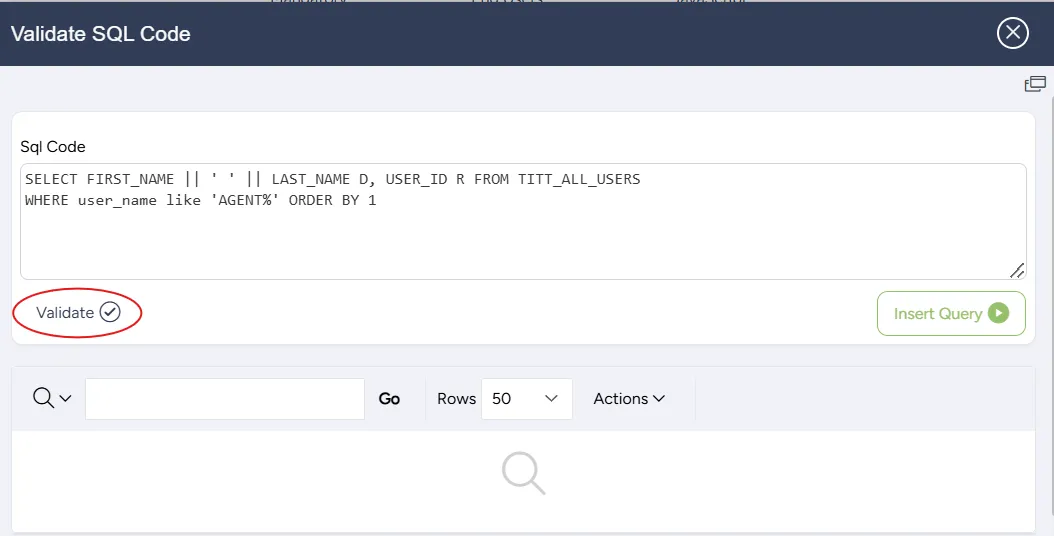
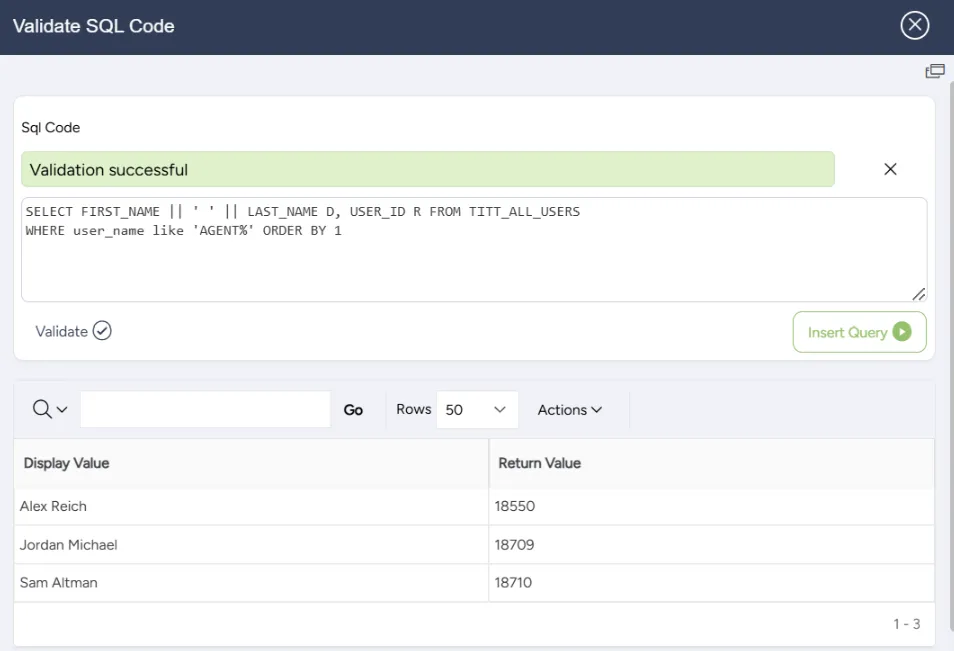
If your query is valid, the message Validation successful appears and the results of the query are displayed at the bottom of the Validate SQL Code dialog.
If you did not enter your query in step 1, you can select Insert Query. The dialog closes, and the query appears in the Code textbox on the previous page. If you already entered your query in step 1, you can close the dialog.
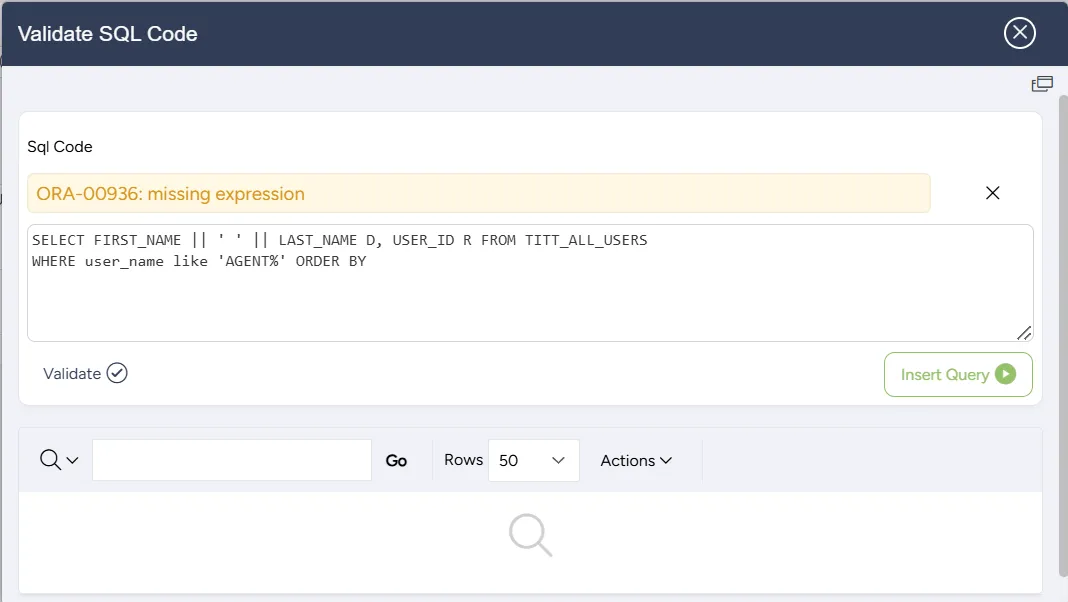
If your query is not valid, an error message appears.
When your query appears correctly in the Code textbox, select Save at the bottom right of the page.
Using a shared List of Values (LOV)
You can set up a List of Values and use it in multiple forms and attributes.
To set up a shared List of Values:
On the left side menu, select Administration.
In the search bar under Search for Admin Configuration Options, enter Shared LOV and select the Shared LOV option that appears.
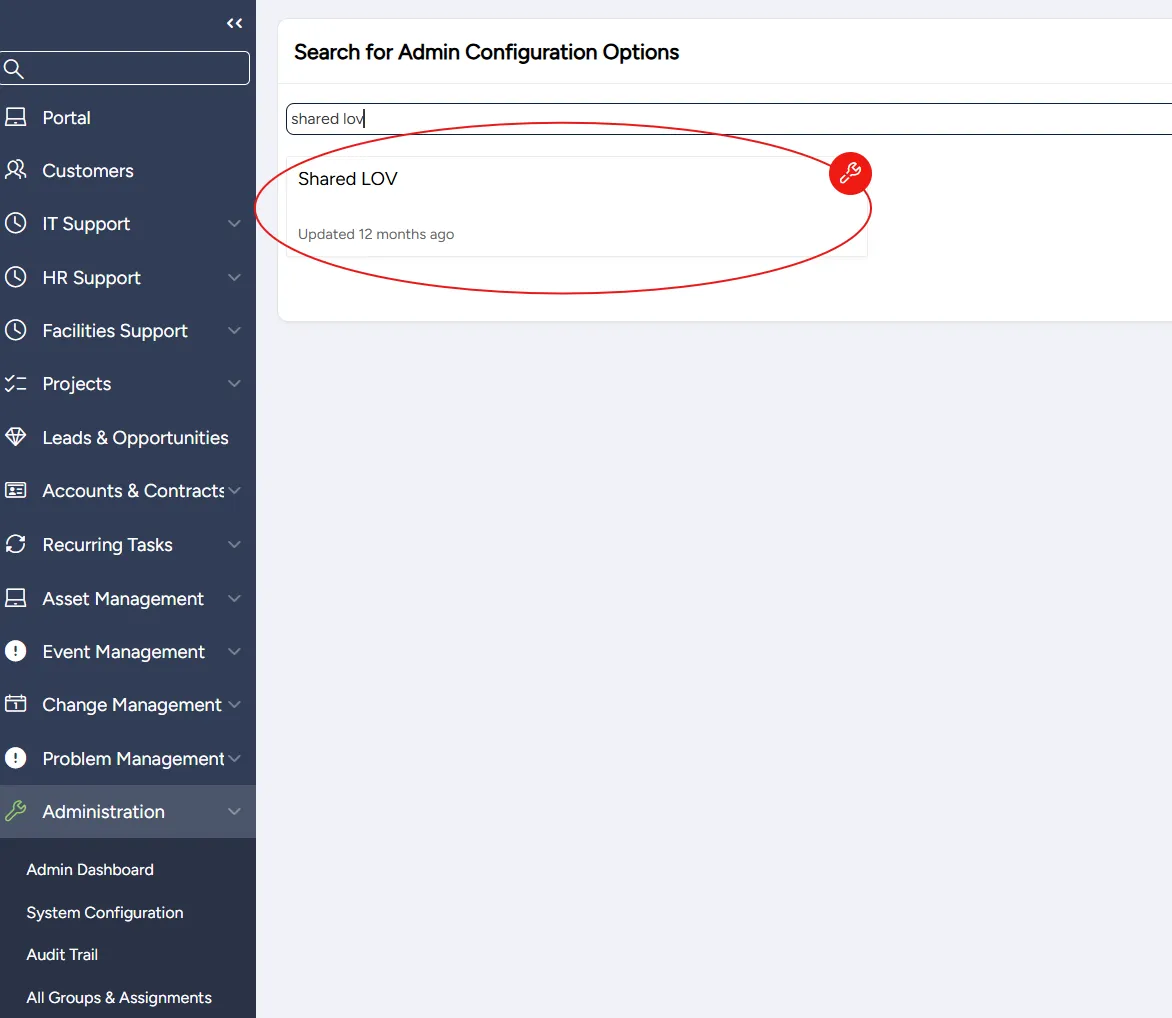
Adding or editing a shared LOV
You can add a new or edit an existing shared LOV at any time. You can create as many shared LOVs as you need
To add or edit a shared LOV:
On the Shared LOV page:
- to add a new LOV, select Create

- to edit an existing LOV, search for or scroll down to the LOV you want to edit and select its Edit icon

In the Shared LOV dialog that opens, enter or edit the LOV's name. If you want the LOV to be active immediately, select the Active checkbox.
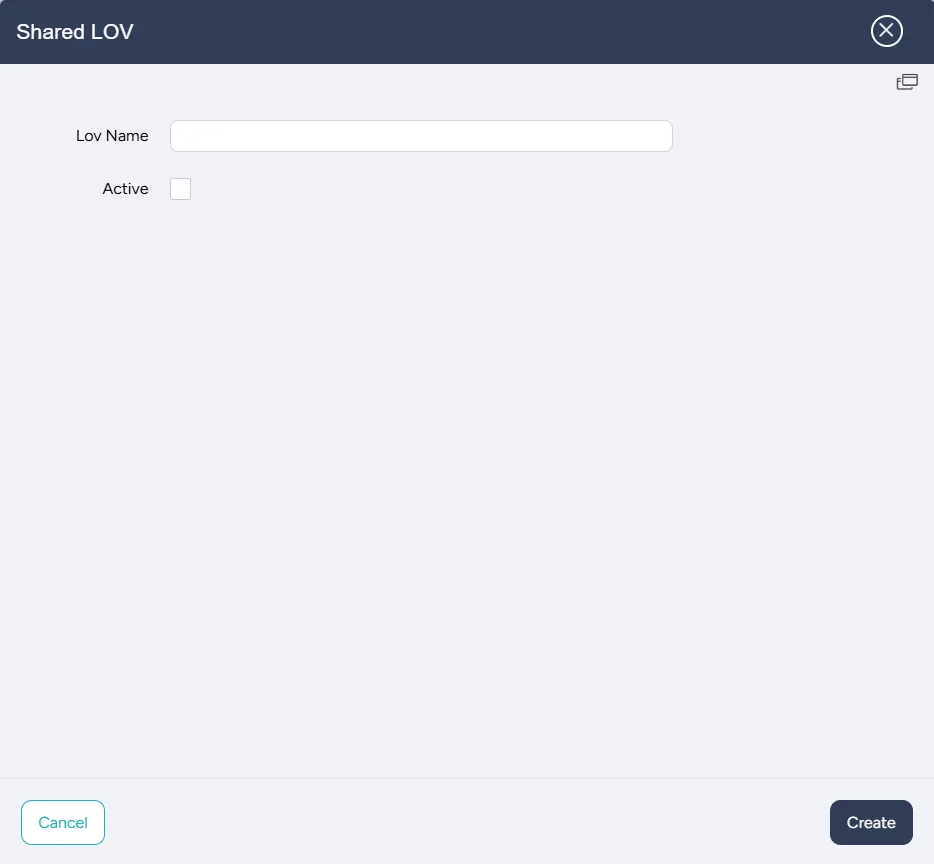
- If creating a new LOV, select Create. Upon success, the message Action Processed appears.
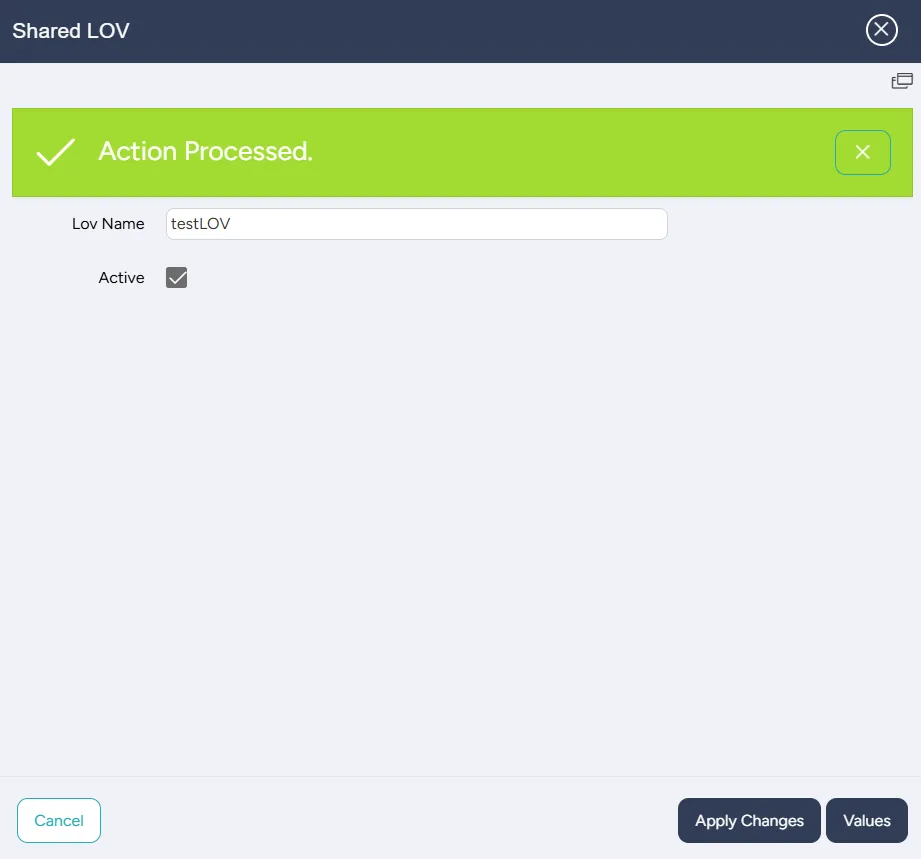
- If editing an existing LOV, select Apply Changes.
To add or edit LOV values, select Values.

In the Update LOV dialog that appears:
- to add a new value: select Add
- to edit an existing value: select the value's corresponding cell and edit its contents
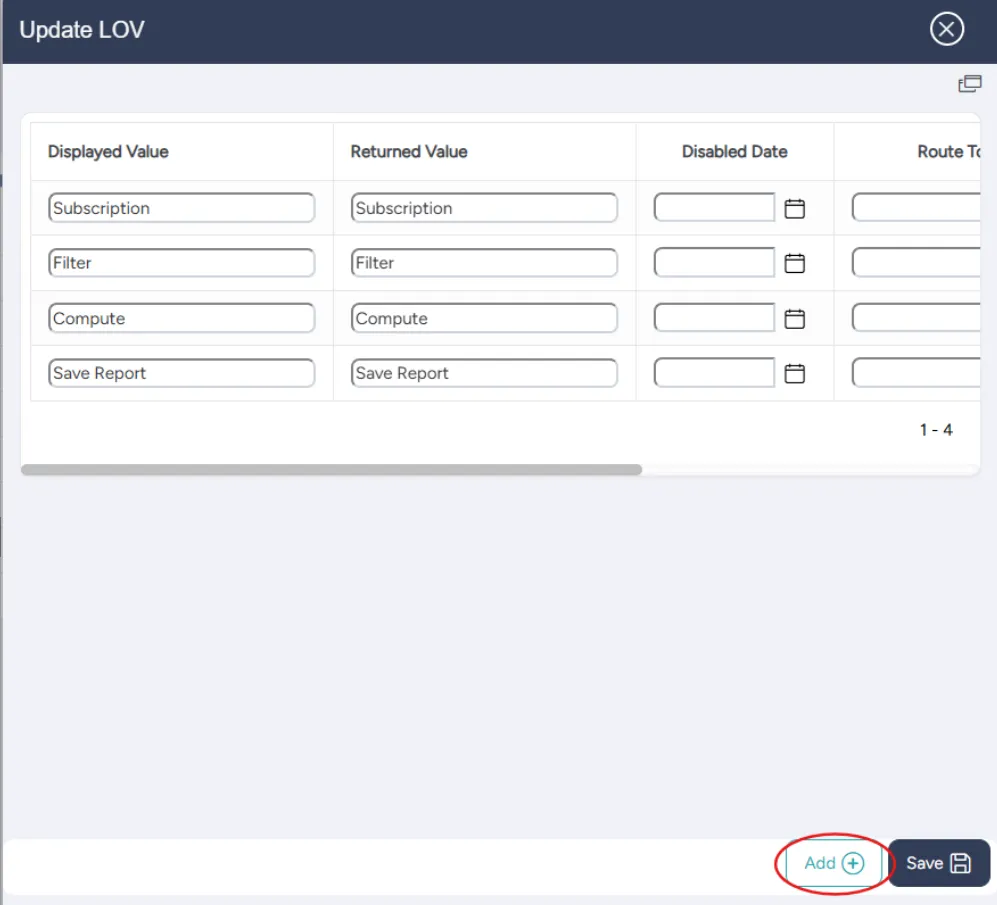
Enter or edit the value's settings:
Field | Description |
|---|---|
Displayed value | Enter the item's displayed value |
Returned value | Enter the item's database value |
Disabled date | Enter date when the item becomes disabled; leave empty if the item remains active indefinitely |
Route to group | Select a value to route a workflow step to a specific group |
Assign to owner ID | Select a value to route a workflow step to a specific agent |
Category ID | Select a value to set the category of the created ticket |
Repeat steps 5 and 6 for as many values as you need.
Select Save.
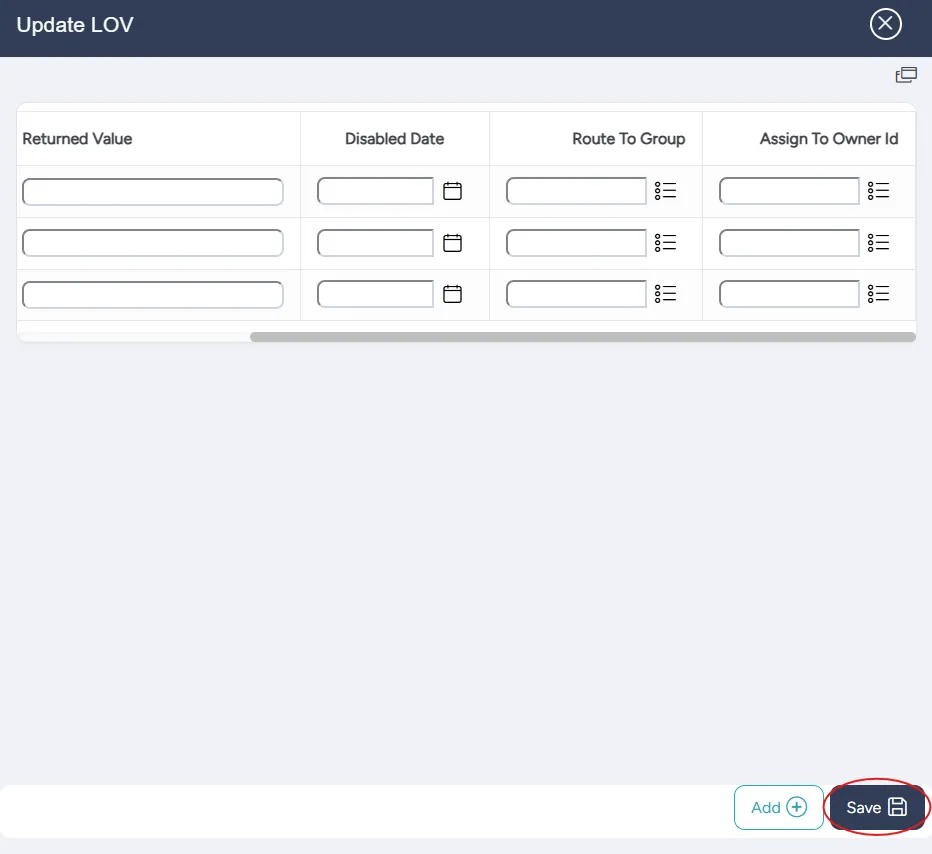
After you finish adding or editing values, close the Update LOV dialog.
Disabling a shared LOV
You can disable a shared LOV at any time. You can enable a disabled LOV at any time.
To disable a shared LOV:
On the Shared LOV page, search for or scroll down to the LOV you want to disable and select the Edit icon in the first column.

In the Shared LOV dialog that opens, clear the Active checkbox.
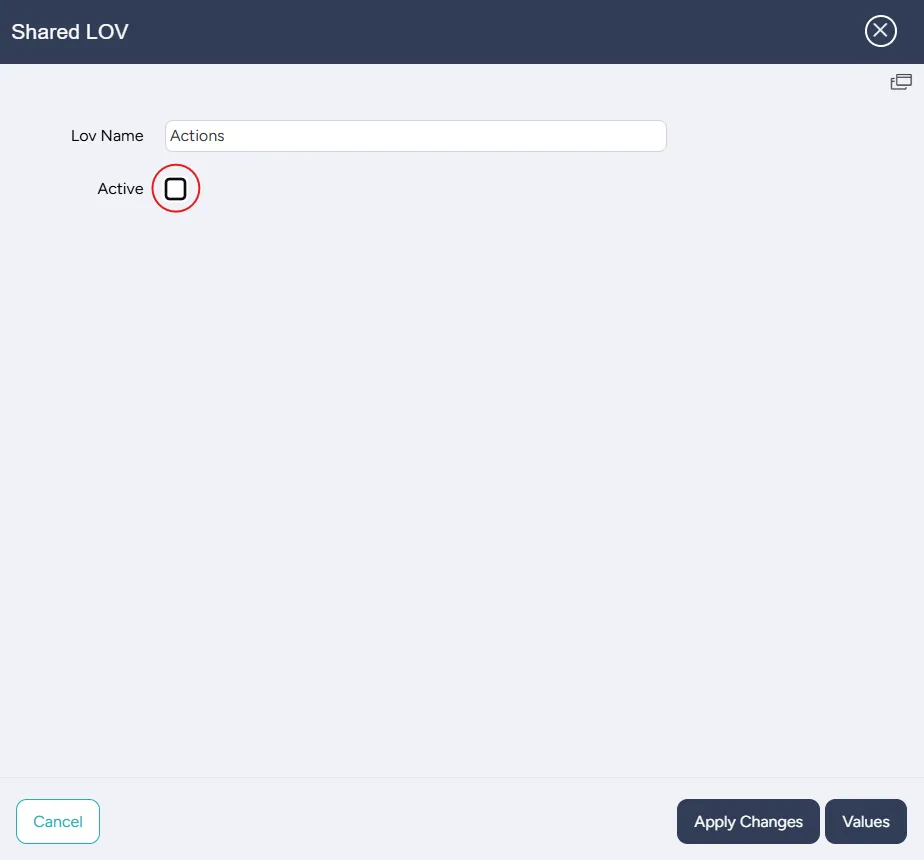
Select Apply Changes.
Controlling attributes' behavior with JavaScript
You can use JavaScript to control the ticket's attributes' behavior based on the attributes' values entered by the user, whether a requester or an agent.
Your JavaScript can be set to run whenever a user changes the attribute's value. For attributes of text types, use onkeyup. For attributes of types checkbox or list of values, use onchange.
When referring to values of attributes, use the AA prefix. When referring to the containers of the attributes and determining their visibility, use the CAA prefix.
For example, if one of your attributes is a checkbox, you can use JavaScript to determine if the checkbox is checked and then display two other attributes only if the checkbox is checked. In this example, AA2 is the value of Attribute 2 and CAA3 and CAA4 are the containers of Attribute 3 and Attribute 4, respectively.
onchange="let isChecked = $('#AA2').is(':checked');

if (isChecked) {
$('#CAA3, #CAA4').show();
} else {
$('#CAA3, #CAA4').hide();
}"
Similarly, if one of your attributes is a text field, you can use JavaScript to display other attributes only if the text has a specific value:
onkeyup="if($('#AA2').val() == 'Loan') {

  $('#CAA3, #CAA4').show();

} else {

  $('#CAA3, #CAA4').hide();

}"
You can also use JavaScript if you want an attribute to display a default value at a certain stage. In the following example, step '171' is when the ticket submission page loads. JavaScript is set up so that attribute AA2 displays the value "Loan" when the ticket submission page loads.
if ($('#pFlowStepId').val() == '171') {

  $('#AA2').val('Loan');

}
Sometimes you might want to use JavaScript both on the Atttributes page and the Validations and JavaScript page, as in Loan example.