Ticket Categories
How to create a new category? Add a new category
How to define specific routing for a category? Set up default routing
I’ve added a new category, but it’s not showing up in the ticket category list. Display a new category in the ticket
Categories overview
Categories enable you to group similar things together. In the ITCC system, you can use ticket categories to group together tickets that have something in common.
Each ticket can have up to three levels of categories.
Categories can be assigned automatically based on a ticket template or selected by the user when creating a ticket.
Categories example
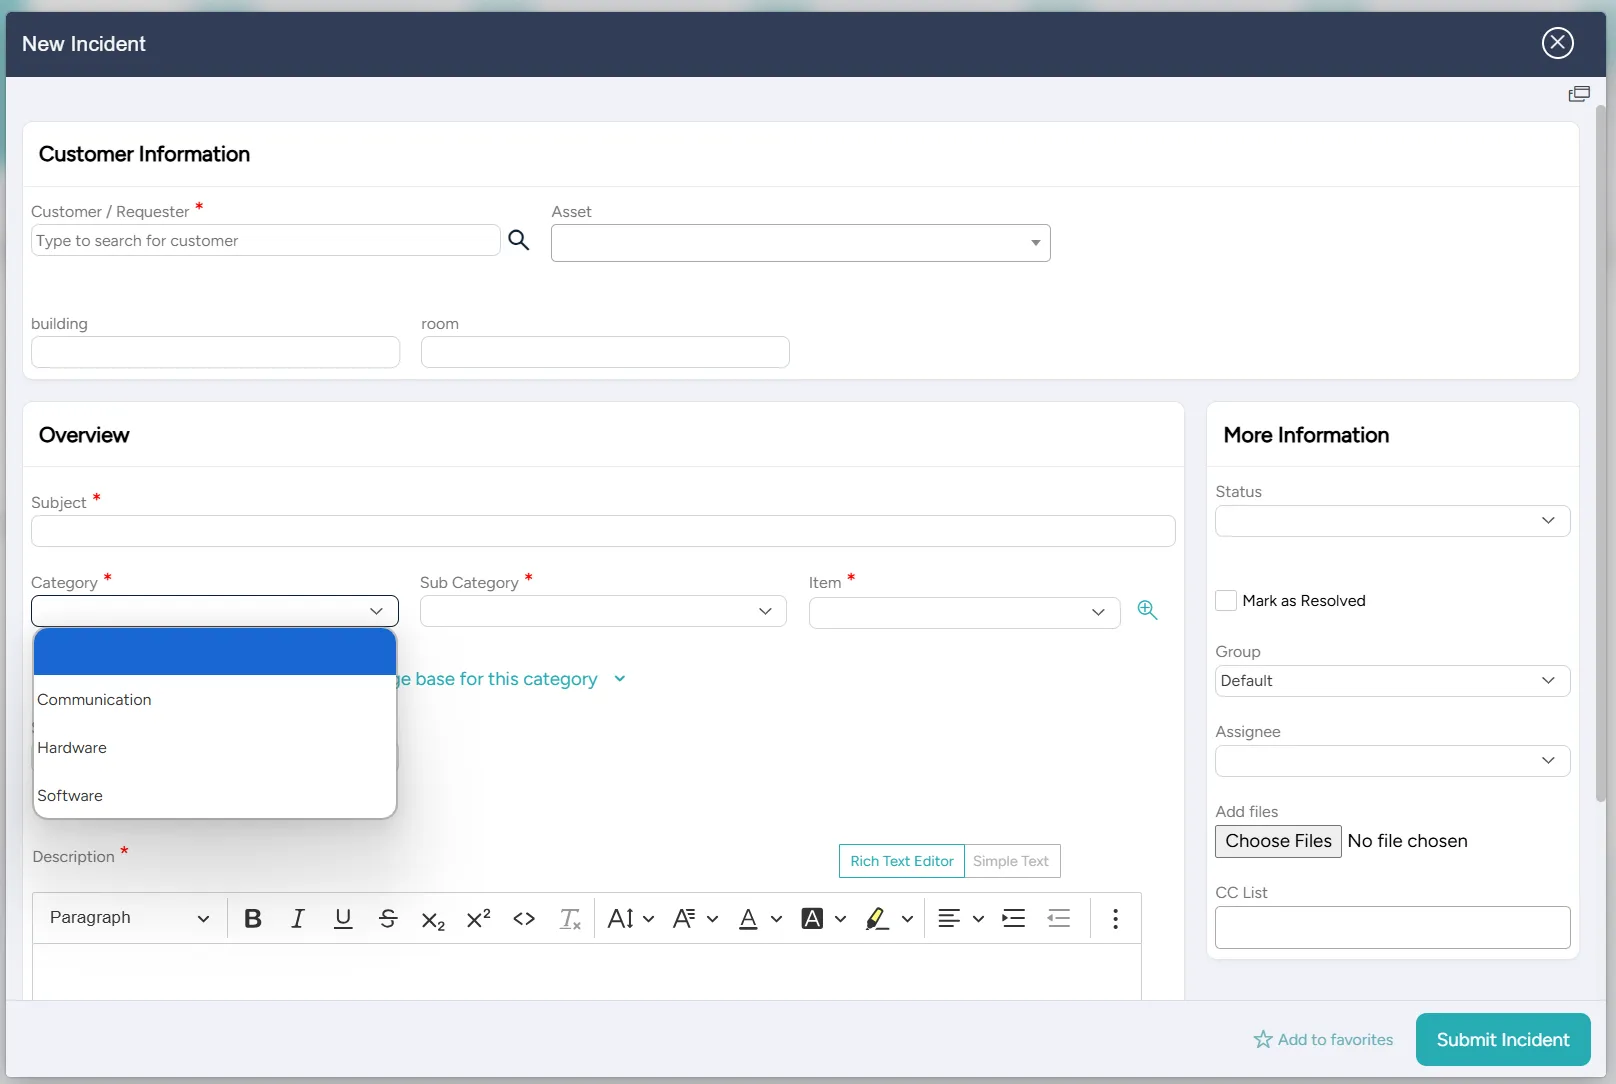
For example, in the following setup, the user must choose between communication, hardware, or software.
Levels of categories
You can set up up to three levels of categories:
- Parent category
- Category
- Subcategory

You can change the label of each level of category to meet your organization's needs. The labels can also be translated into other languages.
For example, in the New Incident screenshot above, the three levels are labeled as Category, Subcategory, and Item.
You can also omit one or two levels of categories.
For each ticket type, you can set default values for the categories.
Category names
Each category is required to have three levels of names:
- Parent category
- Category
- Subcategory
Each name can be used more than once, but the combination of all three names must be unique.
An attempt to enter a combination of names that already exists in the system results in an error.

Displaying categories as icons
You can display the categories as a dropdown list, as in the example above.
You can also display categories as icons and allow the user to choose an icon when creating a new ticket. You can use up to three levels of categories to be displayed as icons.
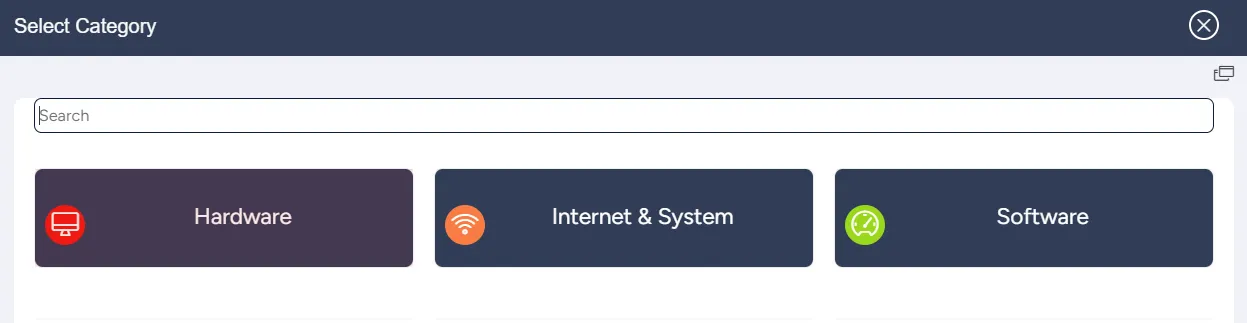
In the following example, when creating a ticket of type Incident, the requestor can select one of the three available parent categories: Hardware, Internet & System, and Software.
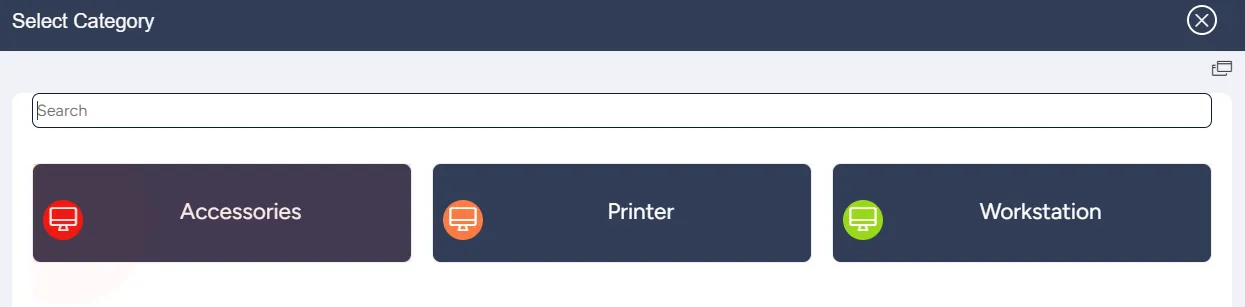
If the requestor selects the Hardware parent category, the next level of categories appears. The requestor can select from Accessories, Printer, or Workstation categories.
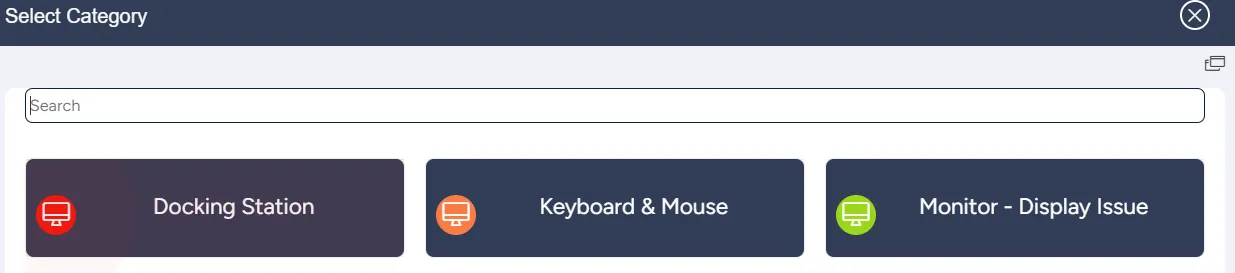
If the requestor selects the Accessories category, the next level of categories appears. The requestor can select from Docking Station, Keyboard & Mouse, and Monitor - Display Issue subcategories.
If the requestor selects Docking Station, a ticket creation dialog opens, with the values of categories set to:
- Parent category: Hardware
- Category: Accessories
- Subcategory: Docking Station
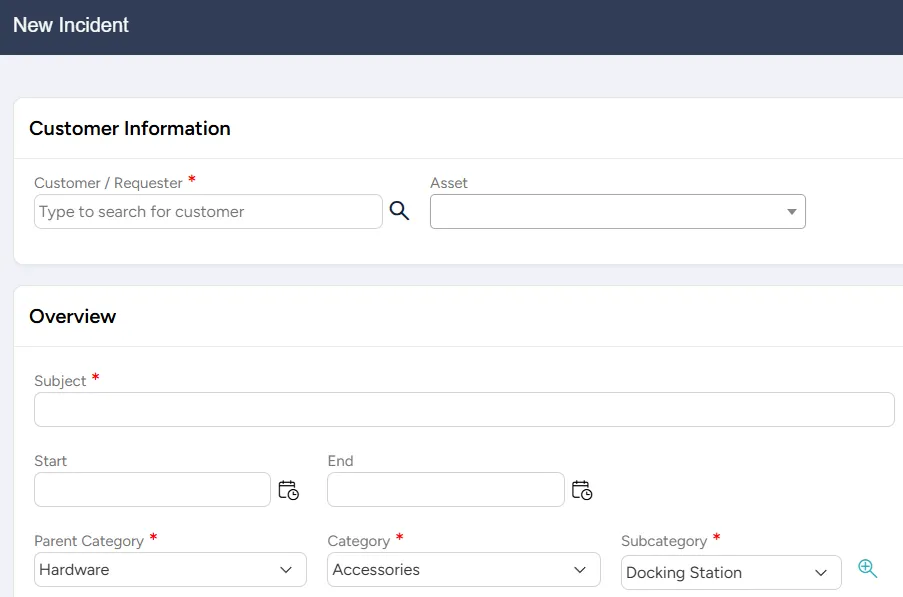
To enable displaying categories as icons for any specific ticket type:
in this ticket type's Categories settings, toggle the Enable Category Selection via Icons and specify the Start Level and the End Level.

Categories and ticket types
You can define separate ticket categories for each ticket type, or you can define categories that are available to more than one ticket type.
It is also possible to make a parent category available to multiple ticket types but limit the ticket types to which its subcategories are available.
For example, if your setup includes the ticket types Incident and Request, you may want to make the parent category Communication available to both. However, only some subcategories of Communication need to be available to both. The subcategory Recording can be either an Incident, where the user has trouble with a recording, or a Request, where the user requests a recording. However, the subcategory Unable to Connect can only be an Incident and not a Request. In settings, you can set up your categories so that Recording is available to both Incident and Request types and Unable to Connect is only available to Incident type.
The category settings override the ticket type settings.
For example, if the default ticket type severity is Medium and the default category severity is High, the ticket's severity is set to High.
Setting up categories
You can set up categories at any time.
To set up categories:
On the left side menu, select Administration.
In the search bar under Search for Admin Configuration Options, type Categories and select the Categories option that appears.
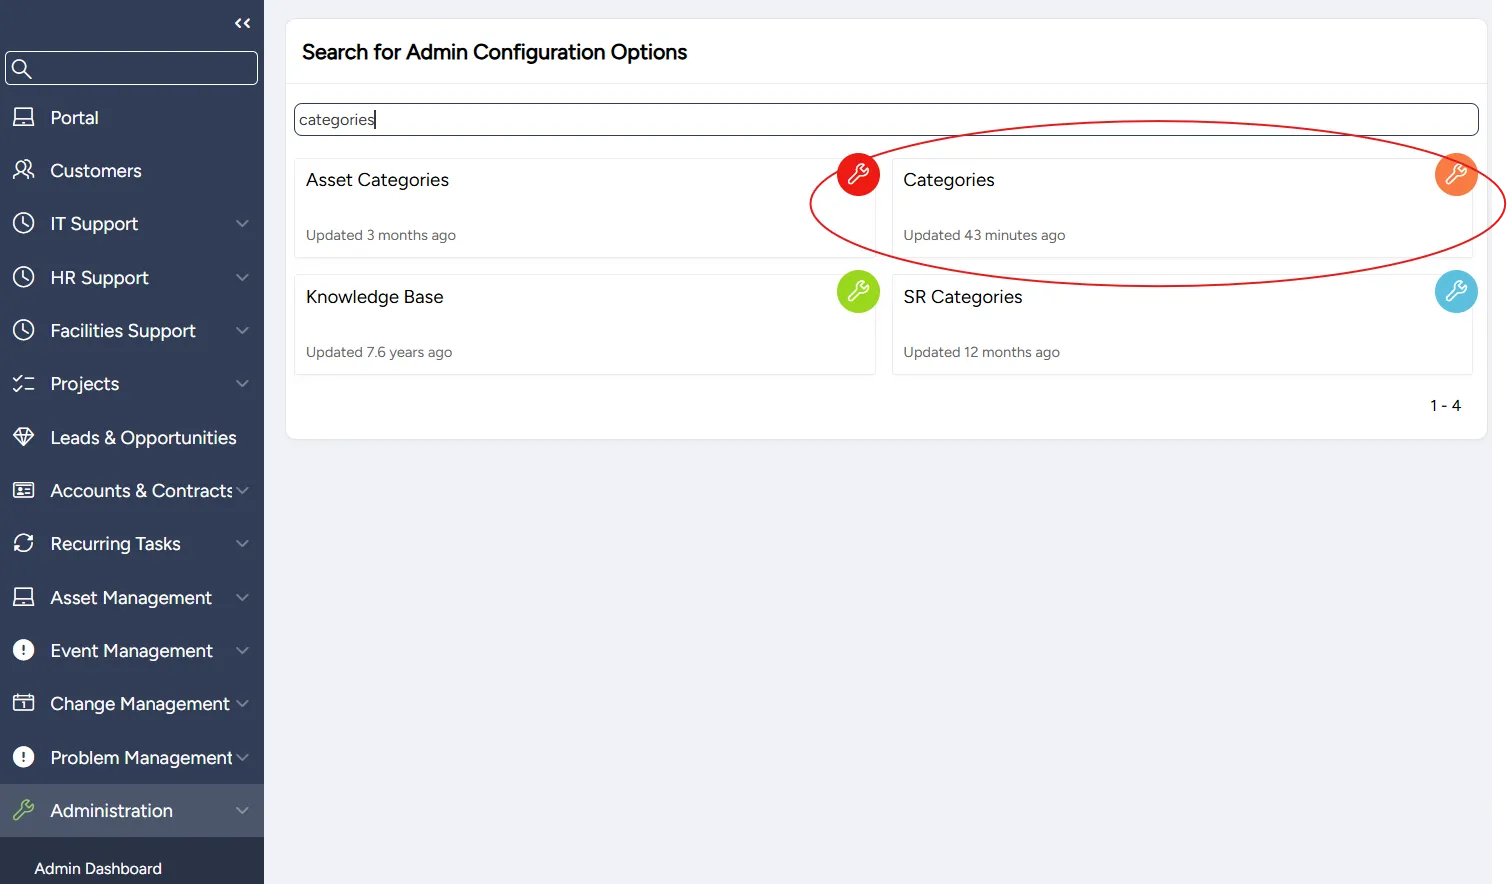
From the Categories page that opens, you can:
Adding or editing a category
You can add a new category or edit an existing category at any time.
To add or edit a category:
On the Categories page:
- To add a category: select Add A New Category and enter the new category's Parent Category, Category, and Subcategory names
- To edit a category: search for or scroll down to the category you want to edit

(Optional - can be done at a later stage) Configure the following:
- Settings
Select Save.
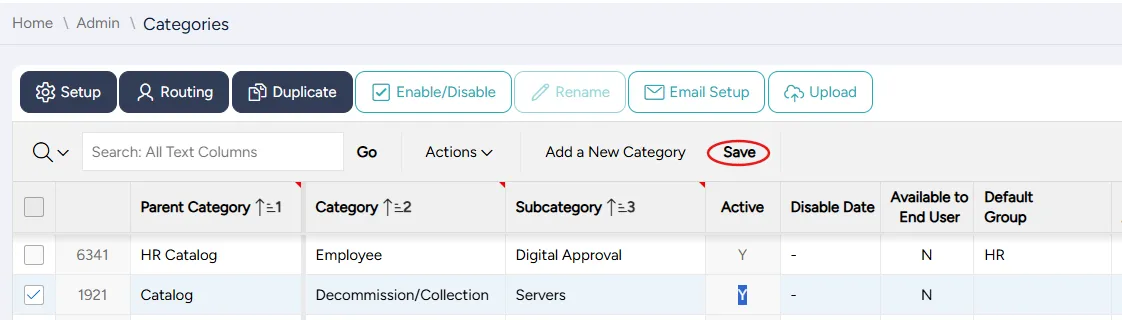
Quick edits for one category
From the Categories page, you can make quick edits to one category at a time.
To configure multiple categories at the same time, see Configuring categories' settings.
The Categories page displays a spreadsheet with each category's settings.
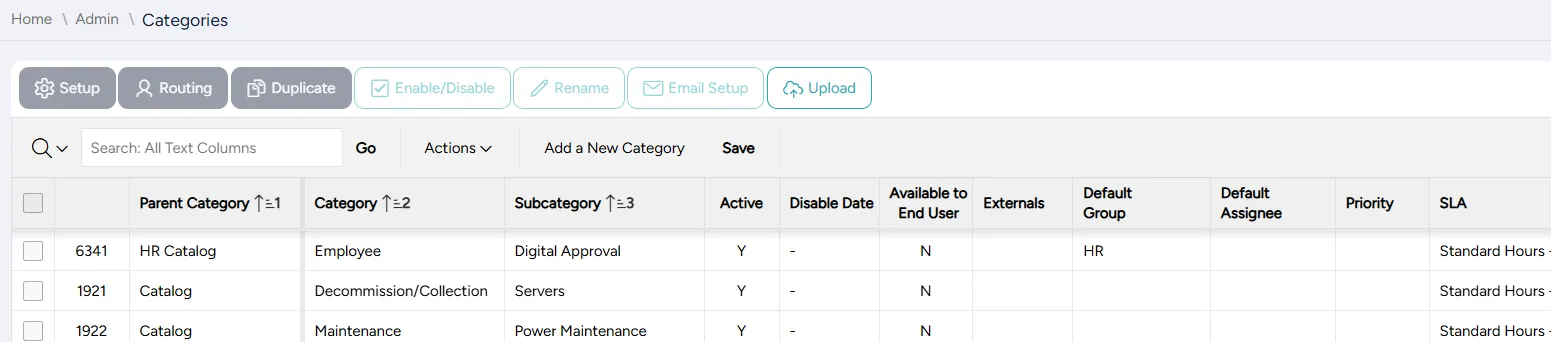
The spreadsheet is fully customizable. Use Actions->Columns to choose which columns the spreadsheet displays.
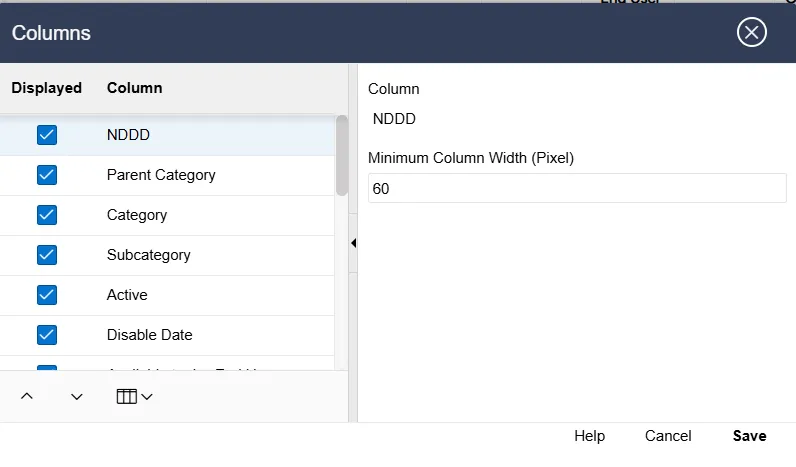
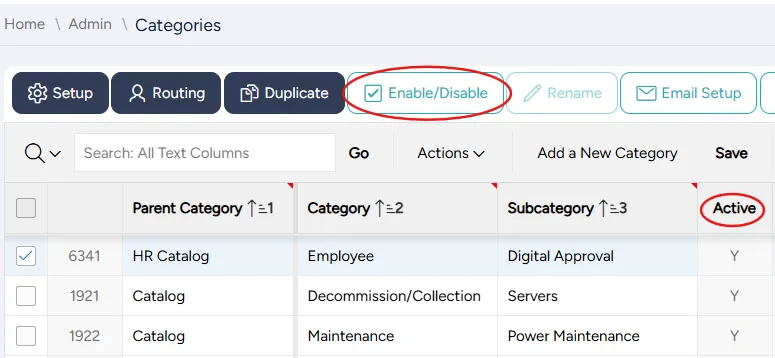
In any setup, some columns are read-only and others are editable. Read-only columns are shaded in gray.
For example, the Active column is read-only. To enable or disable a category, you can enter current or future date into the Disable Date column or use the Enable/Disable button above the spreadsheet.
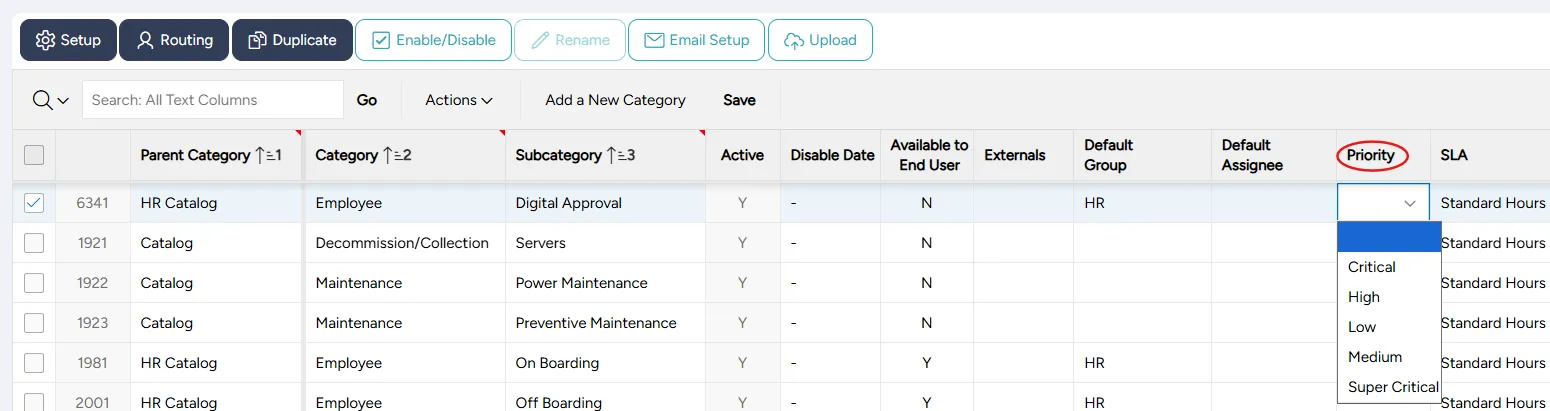
You can use the editable columns to make quick changes to a category's settings.
For example, you can use the Priority column to adjust a category's priority.
Configuring categories' settings
You can make quick edits to one category's settings from the spreadsheet on the Categories page. You can also configure a category's settings through the setup dialog.
When using the setup dialog, you can configure settings for multiple categories at the same time.
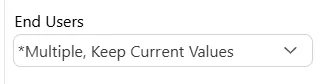
When configuring settings for multiple categories, for each field where different categories have different values, you can choose the value *Multiple, Keep Current Values. This setting preserves the current values for each of the categories instead of overriding them.
To configure categories' settings:
On the Categories page, search for or scroll down to the categories you want to set up and select the corresponding checkboxes in the leftmost column.

Select Setup. The setup dialog opens.

If configuring multiple categories: in the dialog that opens, some of the fields have values *Multiple, Keep Current Values. If you want to override any of these values to be the same across all the selected categories, select the new value from the dropdown list.
Enter or edit the settings:
Option | Description |
|---|---|
End Users | Select Y if tickets in this category are available to end users or N if not available to end users |
Externals | If available to end users, select:
|
Organization | Select the organization for which this category is valid |
Show CI |
|
Service | Select a service you want to relate to this category |
Severity | Select a default severity for this category; overrides default severity for this ticket type |
SLA | Select a default SLA template for this category; overrides default SLA template for this ticket type |
Survey | Select a default survey for this category; overrides default survey for this ticket type |
Auto Close | Select Yes if you want ITCC to automatically resolve the ticket and send a resolution email to the customer.
|
Attach form | Select a form to customize tickets in this category with additional fields |
Disable closure | Select "Yes" to disable closure of tickets of this category and require the agents to change the ticket's category before closing it (applicable to generic categories, such as "submitted by email"); select "No" to enable closure |
Key | Numeric ID for this category |
Missing Attachment Warning Text | Enter a message to be displayed if this category requires an attachment and no attachment is found on the ticket submission |
Limit Types | If the parent category is available to more than one ticket type, you can limit this category to only some of these ticket types by selecting (in this field) ticket types to which this category is limited; leave blank to make this category available to all ticket types that its parent category is available to (see Categories and ticket types for an example) |
HTML Text | |
Display HTML | Select:
|
Display HTML To | Select to whom the HTML is visible:
|
HTML Content | Enter content, in HTML, that you want each ticket in this category to display to the user |
Additional Attributes | If needed, specify up to 5 additional attributes for these categories (used for internal codes from different systems integrated with ITCC) |
Select Save.
Setting up ticket routing
Ticket routing determines to which group or agent a ticket is routed initially and where it is forwarded in case of escalation.
You can set up ticket routing for a category that overrides the default ticket routing for its ticket type.
You can set up ticket routing for multiple categories at the same time. For each of the fields, you can choose to keep the default options for each category or override them for all the categories you are setting up.
The ticket routing can be applied to all tickets in this category, or it can be conditional, based on the values of:
- ticket type
- severity
- user site
- user city
To set up ticket routing:
On the Categories page, search for or scroll down to the categories you want to set up and select the corresponding checkboxes in the leftmost column.
Select Routing.
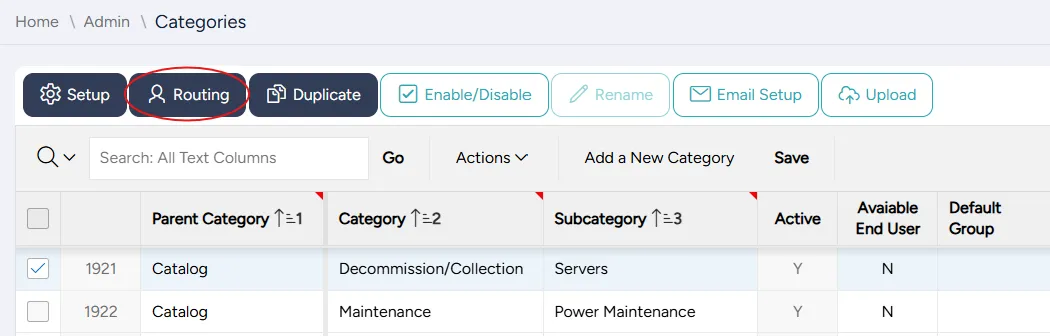
In the dialog that opens, enter routing settings:
Option | Description |
|---|---|
Default Group | Group to which tickets in this category are assigned by default |
Escalation Group | Group to which tickets in this category are assigned in case of escalation |
Default Assignee | The agent to whom tickets in this category are assigned by default |
Follower 1 | User who receives all email updates related to tickets in this category |
Follower 2 | User who receives all email updates related to tickets in this category |
If needed, set up conditional routing.
Select Save.
Conditional routing
Your organization can use conditional routing, where the routing destination depends on certain conditions.
For example, if your organization supports multiple sites, you can use conditional routing to route each ticket to the local team that provides support to the site where the ticket originated.
The following conditions are available for determining the override routing:
Condition | Description |
|---|---|
When Type Is | Choose ticket type for this routing; keep the default ALL value to skip this condition |
When Severity Is | Choose severity value for this routing; keep the default ALL value to skip this condition |
When User Site Is | Choose user site value for this routing; keep the default ALL value to skip this condition |
When User City Is | Choose user city value for this routing; keep the default ALL value to skip this condition |
The following can be set based on the above conditions:
Option | Description |
|---|---|
To Group | Group to which tickets in this category are routed if the conditions are met |
To Assignee | Agent to whom tickets in this category are routed if the conditions are met |
Follower 1 | User who receives all email updates related to tickets in this category if the conditions are met |
Follower 2 | User who receives all email updates related to tickets in this category if the conditions are met |
You can add, edit, or delete conditional routing at any time.
To set up conditional routing:
In the Routing dialog, under Override Routing Options, select Add Row.
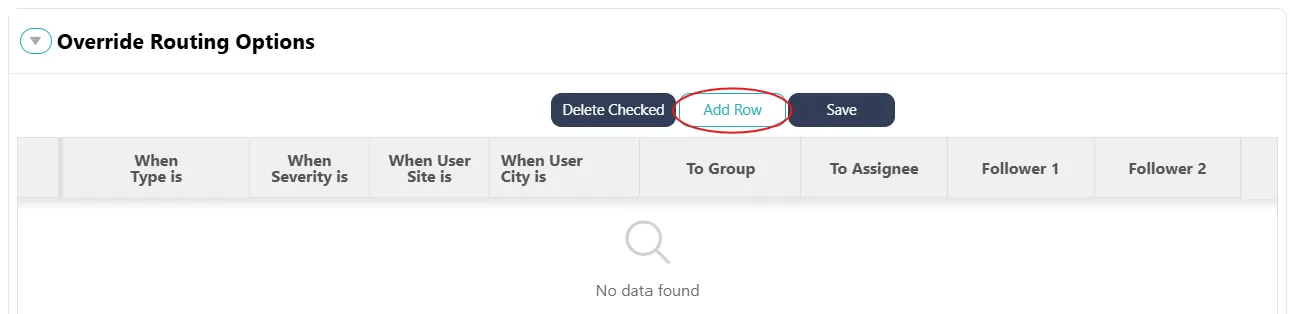
In the new row that appears, select conditions and values you want to apply (see Override routing options).

Add as many conditions as you need. To delete existing conditions, select the corresponding checkboxes in the first column and select Delete Checked.
Select Save.
Duplicating categories
You can duplicate one or more categories and save them under different names.
Duplication can be useful when you want to copy the settings of an existing category when creating a new category.
In some cases, you may want to duplicate a subcategory and use it under a different parent category. For example, if you have a subcategory Unable to Connect under Communication parent category and Webex category, you may want to reuse it under Communication parent category and Zoom category.
To duplicate categories:
On the Categories page, search for or scroll down to the categories you want to duplicate and select the corresponding checkboxes in the leftmost column.
Select Duplicate.

In the Duplicate dialog that opens, enter the new names for the duplicated categories. If you are duplicating more than one category, you can enter one parent category (Category 1) name and one category (Category 2) name for all of them and select Apply.
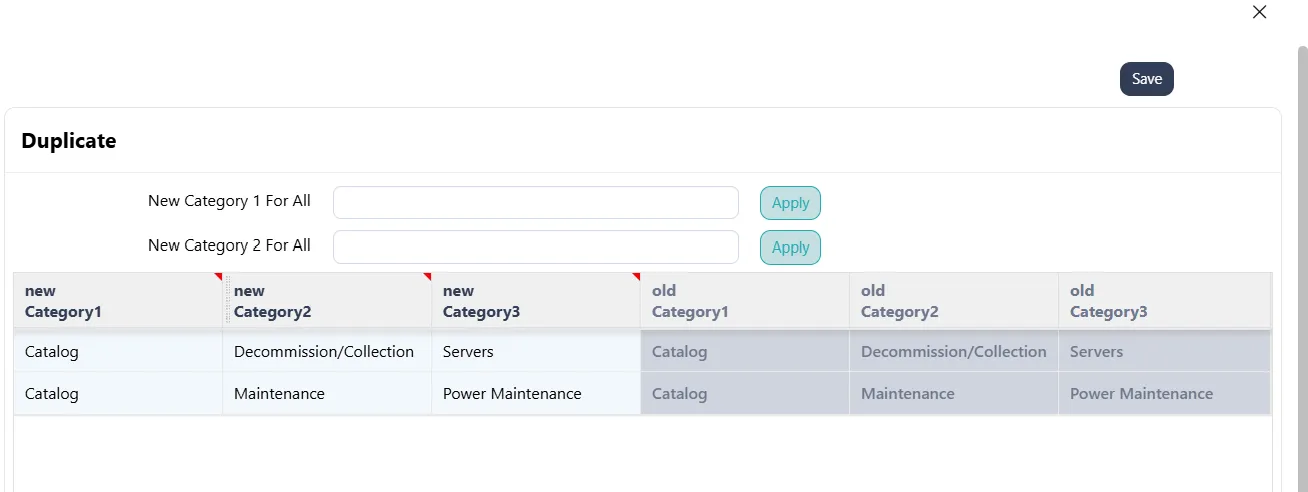
Select Save.
Enabling or disabling a category
You can enable or disable a category at any time.
To enable or disable a category:
On the Categories page, search for or scroll down to the category you want to enable or disable and select the checkbox in the leftmost column.
Select Enable/Disable.
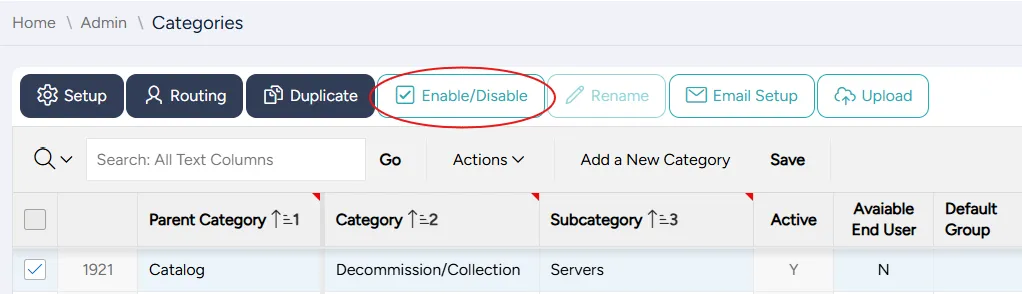
In the dialog that opens:
- to enable the category: set the Effective From to today's date
- to disable the category: set Effective End Date to today's date
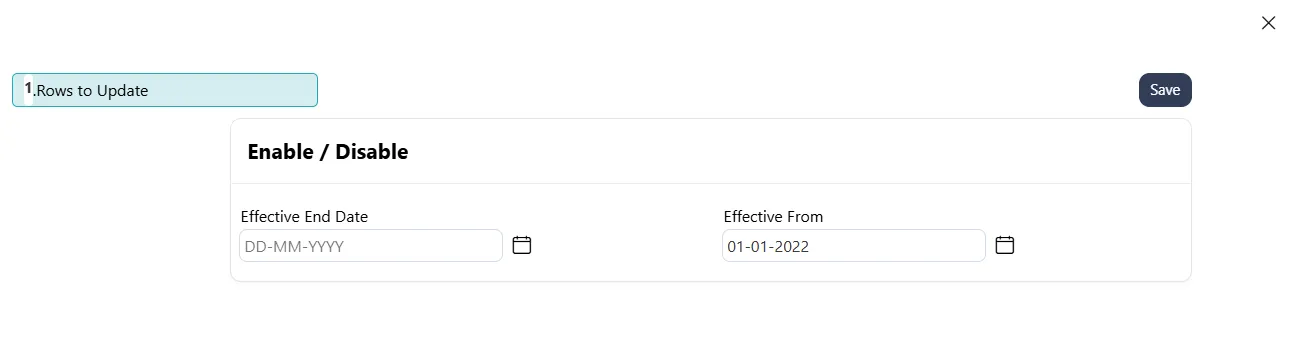
Select Save.
Renaming categories
You can rename a category by editing its entry on the Categories page.
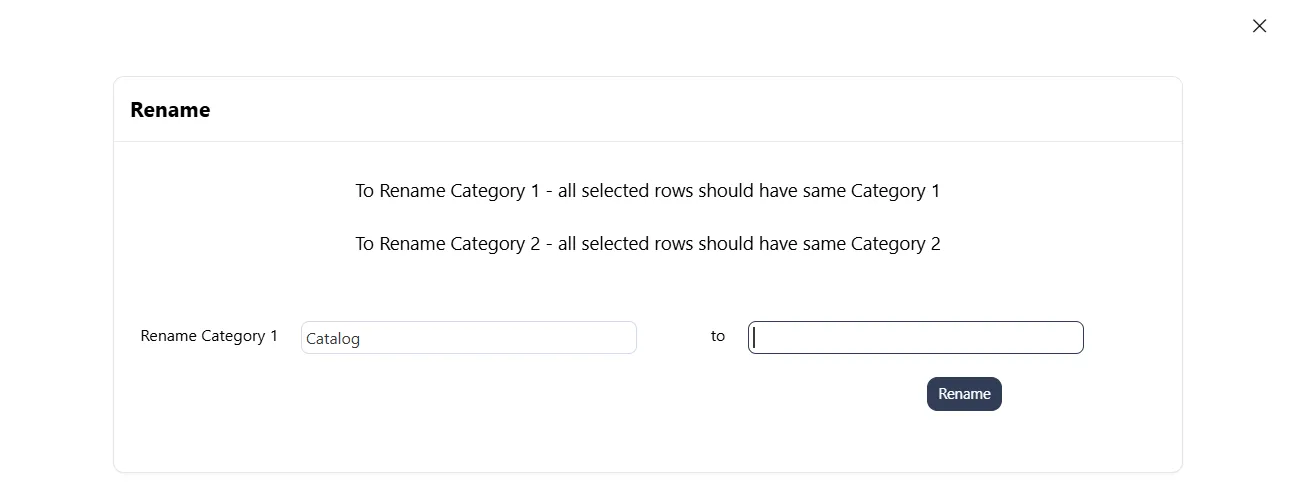
You can also rename multiple categories at the same time if they share their Parent Category name, Category name, or both. You can change the shared name for all of them to a different shared name. This can be useful, for example, if the shared name was originally misspelled.
To rename multiple categories with a shared name:
On the Categories page, search for or scroll down to the categories you want to rename and select the corresponding checkboxes in the leftmost column. (The categories you select must have the same Parent category name or Category name.)
Select Rename.

On the Rename dialog that opens, enter the new name or names and select Rename.
Configuring email notification settings
By default, the system sends out an email whenever an event occurs. For example, when a ticket is created, an email is sent to the Requester. Whenever a ticket is assigned to an agent, an email is sent to this agent.
You can override the system-wide email notification settings using the settings you choose for this category.
To set up email notifications:
On the Categories page, search for or scroll down to the categories you want to set up and select the corresponding checkboxes in the leftmost column.
Select Email Setup.
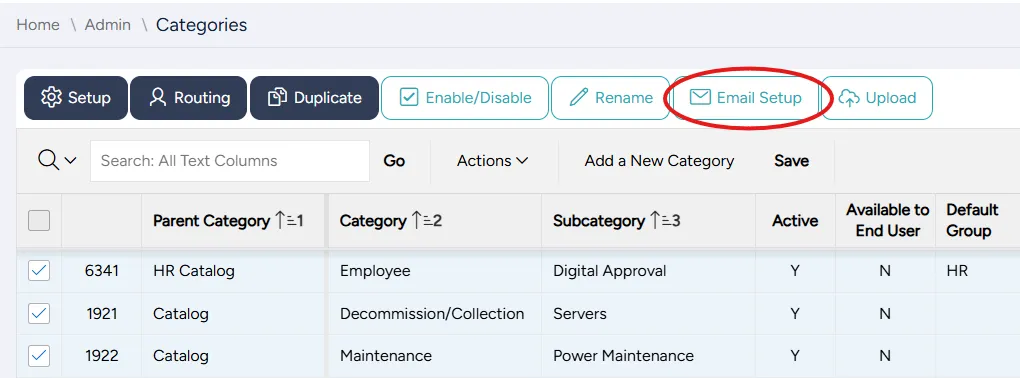
Select or clear the following email rules for this category and for its subtasks:
Email Rule | Description |
|---|---|
!! Discard All Emails | Don't send emails upon any event |
APPROVAL | Send an approval request to the designated approver(s) |
AUTO-DISPATCH | Notify a group that a ticket has been automatically dispatched to them |
CANCEL | Send a confirmation to the customer that their ticket has been cancelled |
CLOSE | Send a confirmation to the customer when their ticket is closed, whether manually by an agent, resolution approved by the customer, or automatically closed due to no response to the resolution notifications |
CREATE | Send a confirmation to the customer about their new ticket creation |
DISPATCH | Notify a group that a ticket has been manually assigned to them |
ESCALATION | Send to designated escalation group when a ticket is answering an escalation condition |
INTLOG | Notify users mentioned in an ITCC thread (internal note) |
ITCC_ICAL | Send a calendar invitation to the specified attendees |
LOG | Notify the customer or group/owner that a new note has been added to the ticket |
PAUSE | When agent changes ticket status to Pending Customer, a notification is sent to the customer with the pending remarks |
PENDING_CLOSURE | Notify the customer about the automatic closure of their ticket due to no response |
PENDING_REMINDER | When ticket status is Pending Customer and the customer is not responding, a reminder is sent to the customer after a specified number of hours |
REASSIGN | Notify agent that a ticket has been assigned to them |
REJECT_TO_REQUESTOR | Notify the requestor that their request has been rejected |
REOPEN | Notify the handling group or assignee that a ticket has been reopened |
RESOLUTION_REMINDER | Remind the customer that a ticket is resolved and awaiting their approval/rejection |
RESOLVE | Notify the customer that a ticket is resolved and awaiting their approval/rejection |
RESOLVE_NV | Notify the customer that a ticket will be resolved in next version |
STATUS_CHANGE | Administrators can set up alerts for changes in ticket status |
TASK_REMINDER | Send a reminder about an upcoming or overdue task |
THIRD_PARTY | Notify a third-party vendor that a ticket has been assigned to them |
Select Save.
Uploading categories from a spreadsheet
You can upload categories in bulk from a spreadsheet.
If you need a template to help you format your spreadsheet, you can download it from the Categories page.
To upload categories from a spreadsheet:
If you need a template for your categories spreadsheet, select Download Template.
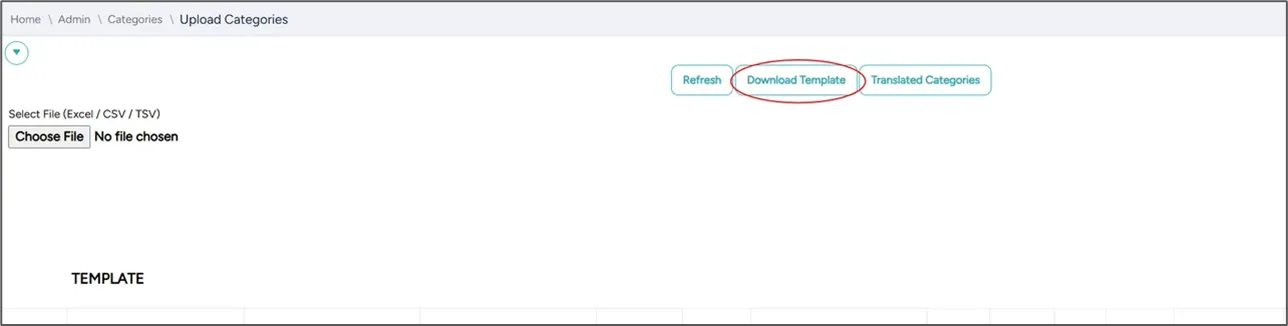
On the Categories page, select Upload. The Upload Categories page opens.

When your spreadsheet is ready, select Choose File.
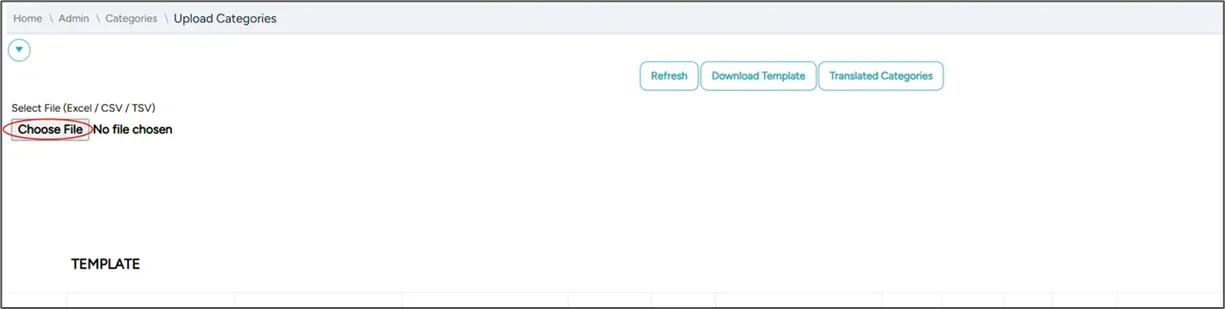
Select the file you want to upload and select Open.
Select the Load File button that appears.
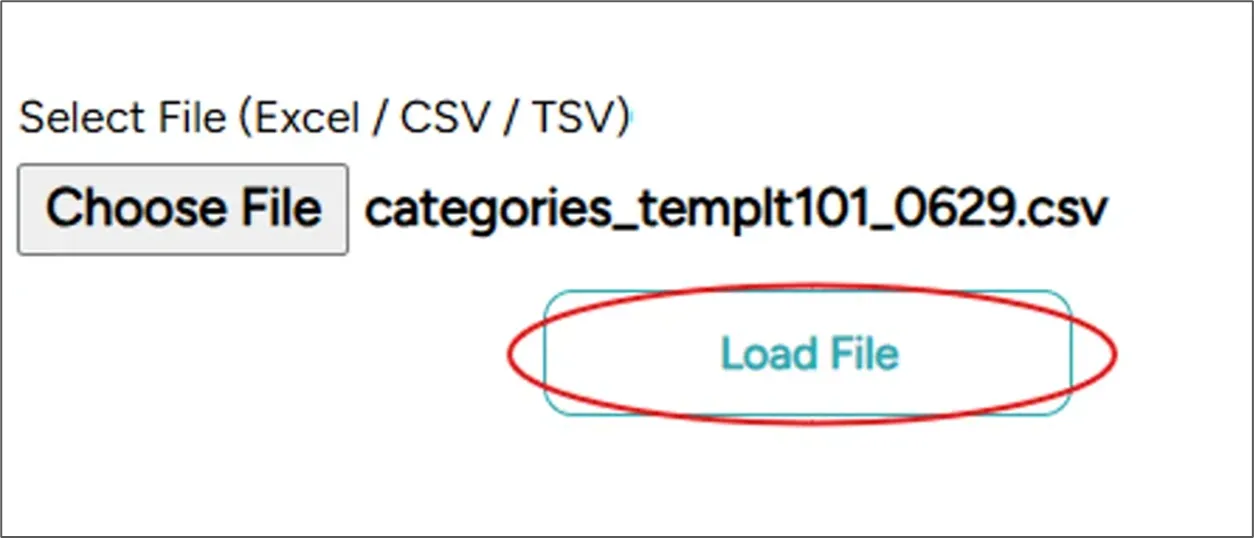
After your file is uploaded, the following message appears:
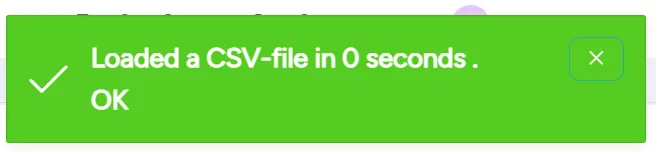
Select the Process All Records button that appears.

After the records are processed, a success message appears.

Making a new category available to a ticket type
When you create a new category, it is automatically available to those ticket types that have no parent category filters.
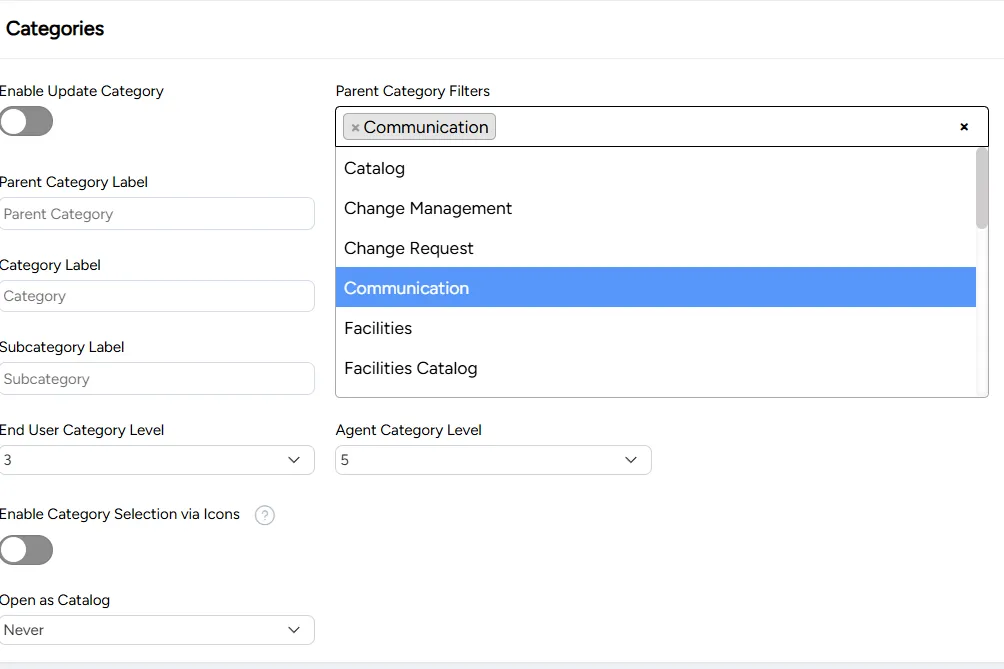
For ticket types with parent category filters, you must add the new parent category to the filter in order to make it available.
To add a parent category to a ticket type filter:
On the left side menu, select Administration.
In the search bar under Search for Admin Configuration Options, enter Ticket Types and select the Ticket Types option that appears.
Search for or scroll down to the ticket type to which you want to add the parent category and select its Edit icon.
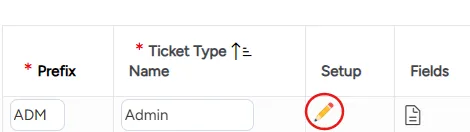
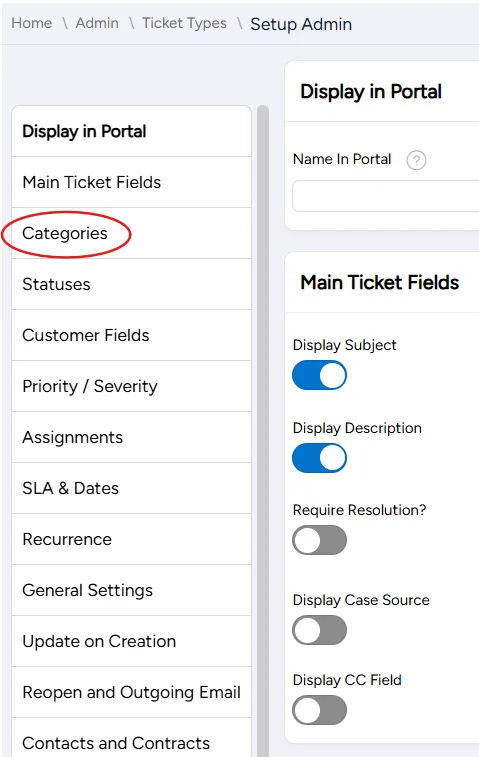
On the Setup Admin page that opens, on the menu on the right, select Categories.
From the Parent Category Filters dropdown list, select the parent category you want to add.
Select Save.