Azure Connectors
Azure Connectors Summary
This guide provides a comprehensive overview of how to establish connections between the ITCC System and Microsoft Azure. It includes instructions for configuring incoming email, synchronizing assets via Microsoft Azure Intune, syncing users through Azure Active Directory (AD), and linking OneDrive folders.
A lost connection between ITCC and Azure can occur for various reasons, including Network issues between the Azure server and the ITCC server (e.g., internal network problems or power outages), expired secret value, server restarts or Other unforeseen disruptions.
Step 1: Create an App Registration in Azure
- Open Azure Portal: Go to Azure and navigate to App registrations.
- New Registration: Click on New registration.
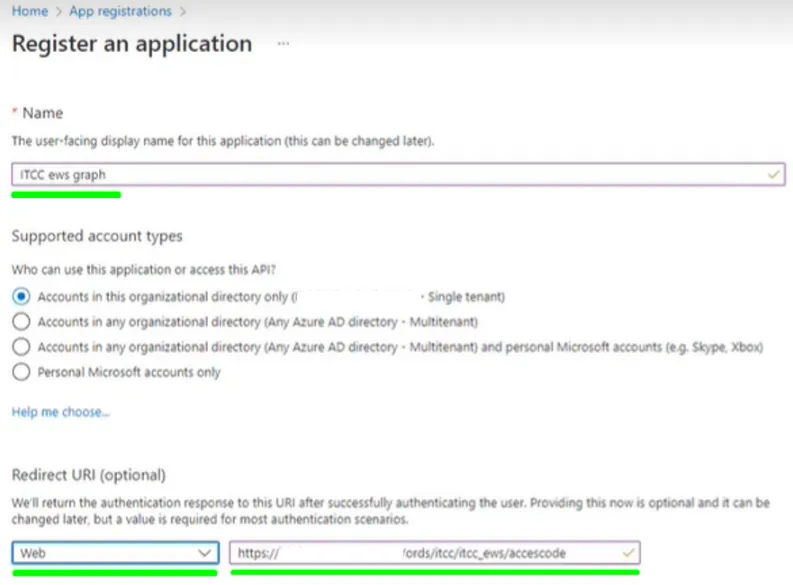
- Fill in Registration Details:
- Name: Enter a descriptive name for your app.
- Supported Account Types: Choose the appropriate option based on your needs.
- Redirect URI: Select Web and enter the appropriate URI based on your use case:
- For Incoming Mail: https://domain/ords/itcc/itcc_ews/accescode/
- For Azure AD/MS Azure Intune/OneDrive: http://localhost/myapp/
- Ensure the redirect URI ends with a /.
- Register the App: Click the Register button.
Step 2: Add a Client Secret
- After registration, click on Add a certificate or secret.
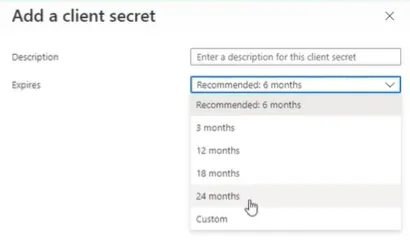
- Click on New client secret.
- Description: Enter "ITCC Client Secret".
- Expires: Set to 24 months (or more).
- Click Add.
- Copy the Value: Make sure to copy the client secret value and save it in a secure location. You won’t be able to see it again once you navigate away from this screen.
Step 3: Configure API Permissions
- Go back to the App registrations and select your app.
- Click on View API permissions.
- Click Add a permission and select Microsoft Graph.
- Select Delegated permissions and search for the permissions needed based on your connections:
Incoming Mail:
openid, offline_access, IMAP.AccessAsUser.All, Mail.ReadWrite, Mail.ReadWrite.Shared, SMTP.Send, User.Read, User.Read.All
OneDrive:
openid, offline_access, Files.ReadWrite.All
Azure AD:
openid, offline_access, User.Read.All
MS Azure Intune:
openid, offline_access, DeviceManagementManagedDevices.Read.All, DeviceManagementApps.Read.All, DeviceManagementConfiguration.Read.All, DeviceManagementServiceConfig.Read.All
OAuth2:
openid
6. Click Grant admin consent for [Your Company Name] and confirm.
Step 4: Collect Application Information
Copy the following details of your new app registration from App registrations and save them:
- Application (client) ID
- Directory (tenant) ID
- Redirect URI
- Secret Value (from step 2)
Step 5: Set Up Connectors in ITCC
You can now use the collected details to configure the following connectors in ITCC:
- Incoming Mail
- OneDrive
- Azure AD
- MS Intune
- oAuth2
5.1 Incoming Mail Connector
- Navigate to Administration -> Incoming Mail Integration and click on Add.
- Fill in the following fields:
Field | Value |
|---|---|
Protocol | EWS |
Proxy / Wallet | - If a proxy is installed on the ITCC server, select "Proxy" (default option). - If not, install Oracle Wallet on the ITCC server and select "Wallet". |
User | Mailbox address |
Message | Automatically generated by the ITCC |
Login Code | login.microsoftonline.com/Directory tenant ID/oauth2/v2.0/ |
Client ID | Application (client) ID (Refer to Step 4) |
Client Secret | Client Secret (Refer to Step 2) |
Proxy | If "Proxy" is selected, enter: http://localhost:82/itccproxy/ |
Wallet Path | If "Wallet" is selected, enter the wallet path (the mail app wallet can be reused). |
Wallet Password | If "Wallet" is selected, enter the wallet password (the mail app wallet can be reused). |
Redirect URL | The redirect URI defined in the Azure App Registration (Refer to Step 4) |
- Click Save and fill in the additional fields:
Field | Value |
|---|---|
Auth URL | https://login.microsoftonline.com/Directory tenant ID /oauth2/v2.0/authorize?client_id= Application Client ID response_type=code&redirect_uri=redirect to ITCC external URL &response_mode=query&scope=openid offline_access https://graph.microsoft.com/IMAP.AccessAsUser.All https://graph.microsoft.com/Mail.ReadWrite&state=12345 For example: https://login.microsoftonline.com/XXXXXXXXXXXXXXXXXXXXXXXXXXXXXXXa5d73/oauth2/v2.0/authorize?client_id=XXXXXXXXXXXXXXXXXXXXXXXXXXx42c20&response_type=code&redirect_uri=https://poc.it-care-center.com/ords/itcc/itcc_ews/accescode&response_mode=query&scope=openid offline_access https://graph.microsoft.com/IMAP.AccessAsUser.All https://graph.microsoft.com/Mail.ReadWrite&state=12345 |
Access Code | Click here to learn how to generate an access code. |
5.2 OneDrive Connector
- Navigate to Administration -> One Drive Connectors and click on Add.
- Fill in the necessary fields with the relevant information:
Field | Value |
|---|---|
Activate | YES |
Name | Provide a meaningful name |
Login Code / Tenant ID | Directory tenant ID (Refer to Step 4) |
Client ID | Application (client) ID (Refer to Step 4) |
Client Secret | Client Secret (Refer to Step 2) |
Proxy/Wallet | Select “Proxy” if a proxy is installed on the ITCC server (default option). If not, select “Wallet” after installing Oracle Wallet on the server. |
Proxy URL | If "Proxy" is selected, enter: http://localhost:82/itccproxy/ |
Wallet Path | If "Wallet" is selected, enter the wallet path (the mail app wallet can be reused). |
Wallet Password | If "Wallet" is selected, enter the wallet password (the mail app wallet can be reused). |
Redirect URL | The redirect URI defined in the Azure App Registration (Refer to Step 4) |
3. Click Save and fill in the additional fields:
Field | Value |
|---|---|
Auth URL | https://login.microsoftonline.com/Directory tenant ID /oauth2/v2.0/authorize?client_id= Application Client ID response_type=code&redirect_uri=redirect to ITCC external URL &response_mode=query&scope=openid offline_access https://graph.microsoft.com/IMAP.AccessAsUser.All https://graph.microsoft.com/Mail.ReadWrite&state=12345 For example:
https://login.microsoftonline.com/xxxxxxxxxxxxxx/oauth2/v2.0/authorize?client_id=xxxxxxxxxxxxxcec0&response_type=code&redirect_uri=http://localhost/myapp/&response_mode=query&scope=openid+offline_access+Files.ReadWrite.All |
Access Code | Click here to learn how to generate an access code. |
5.3 Azure AD Connector
- Navigate to Administration -> Azure AD Sync.
- Enter the relevant details similar to the previous connectors:
Field | Value |
|---|---|
Tenant ID | Directory tenant ID (Refer to Step 4) |
Client ID | Application (client) ID (Refer to Step 4) |
Client Secret | Client Secret (Refer to Step 2) |
Redirect URL | The redirect URI defined in the Azure App Registration (refer to Step 4) |
Proxy |
3. Click Save and fill in the additional fields:
Field | Value |
|---|---|
Auth URL | https://login.microsoftonline.com/Directory tenant ID /oauth2/v2.0/authorize?client_id= Application Client ID response_type=code&redirect_uri=redirect to ITCC external URL &response_mode=query&scope=openid offline_access https://graph.microsoft.com/IMAP.AccessAsUser.All https://graph.microsoft.com/Mail.ReadWrite&state=12345 For example:
https://login.microsoftonline.com/xxxxxxxxxxxxxx/oauth2/v2.0/authorize?client_id=xxxxxxxxxxxxxcec0&response_type=code&redirect_uri=http://localhost/myapp/&response_mode=query&scope=openid+offline_access+Files.ReadWrite.All |
Access Code | Click here to learn how to generate an access code. |
5.4 MS Intune Connector
- Navigate to Administration -> MS Azure Intune.
- Fill in the fields as needed, ensuring all relevant information is included:
Field | Value |
|---|---|
Activate | YES |
Name | Provide a meaningful name |
Login Code / Tenant ID | Directory tenant ID (Refer to Step 4) |
Client ID | Application (client) ID (Refer to Step 4) |
Client Secret | Client Secret (Refer to Step 2) |
Proxy/Wallet | Select “Proxy” if a proxy is installed on the ITCC server (default option). If not, select “Wallet” after installing Oracle Wallet on the server. |
Proxy URL | If "Proxy" is selected, enter: http://localhost:82/itccproxy/ |
Wallet Path | If "Wallet" is selected, enter the wallet path (the mail app wallet can be reused). |
Wallet Password | If "Wallet" is selected, enter the wallet password (the mail app wallet can be reused). |
Redirect URL | The redirect URI defined in the Azure App Registration (refer to Step 4). |
3. Click Save and fill in the additional fields:
Field | Value |
|---|---|
Auth URL | https://login.microsoftonline.com/Directory tenant ID /oauth2/v2.0/authorize?client_id= Application Client ID response_type=code&redirect_uri=redirect to ITCC external URL &response_mode=query&scope=openid offline_access https://graph.microsoft.com/IMAP.AccessAsUser.All https://graph.microsoft.com/Mail.ReadWrite&state=12345 For example:
https://login.microsoftonline.com/xxxxxxxxxxxxxx/oauth2/v2.0/authorize?client_id=xxxxxxxxxxxxxcec0&response_type=code&redirect_uri=http://localhost/myapp/&response_mode=query&scope=openid+offline_access+Files.ReadWrite.All |
Access Code | Click here to learn how to generate an access code. |
5.5 oAuth2 Connector
- Navigate to Administration -> Authentication.
- Fill in the fields in the oAuth2 region as needed, ensuring all relevant information is included:
Field | Value |
|---|---|
Login Redirect | Replace the Tenant_ID with the application Directory tenant ID (Refer to Step 4). |
Oauth2 Button Name | Provide a meaningful name for the Oauth2 login button that will be displayed in the login page. |
Client ID | Application (client) ID (Refer to Step 4) |
Client Secret | Client Secret (Refer to Step 2) |
Redirect URL | The redirect URI defined in the Azure App Registration(Refer to Step 4) |
Token API URL | Replace the Tenant_ID with the application Directory tenant ID (Refer to Step 4). |
Get User API URL | |
Identify User By | Select either to identify the login user by the ITCC user’s email or by username. |
3. Click Save to save the changes.