Validations and JavaScript
Validations and JavaScript Overview
You can add SQL code validations and JavaScript code to your ticket form.
For more information and examples of validations, see Validations.
For more information and examples of JavaScript, see JavaScript.
Adding or editing validations and JavaScript
You can add or edit validations and JavaScript at any time.
To add or edit validations and JavaScript:
From the tabs at the top, choose Validations and JavaScript.

Enter or edit the JavaScript that is run upon page load in the JavaScript/JQ textbox.
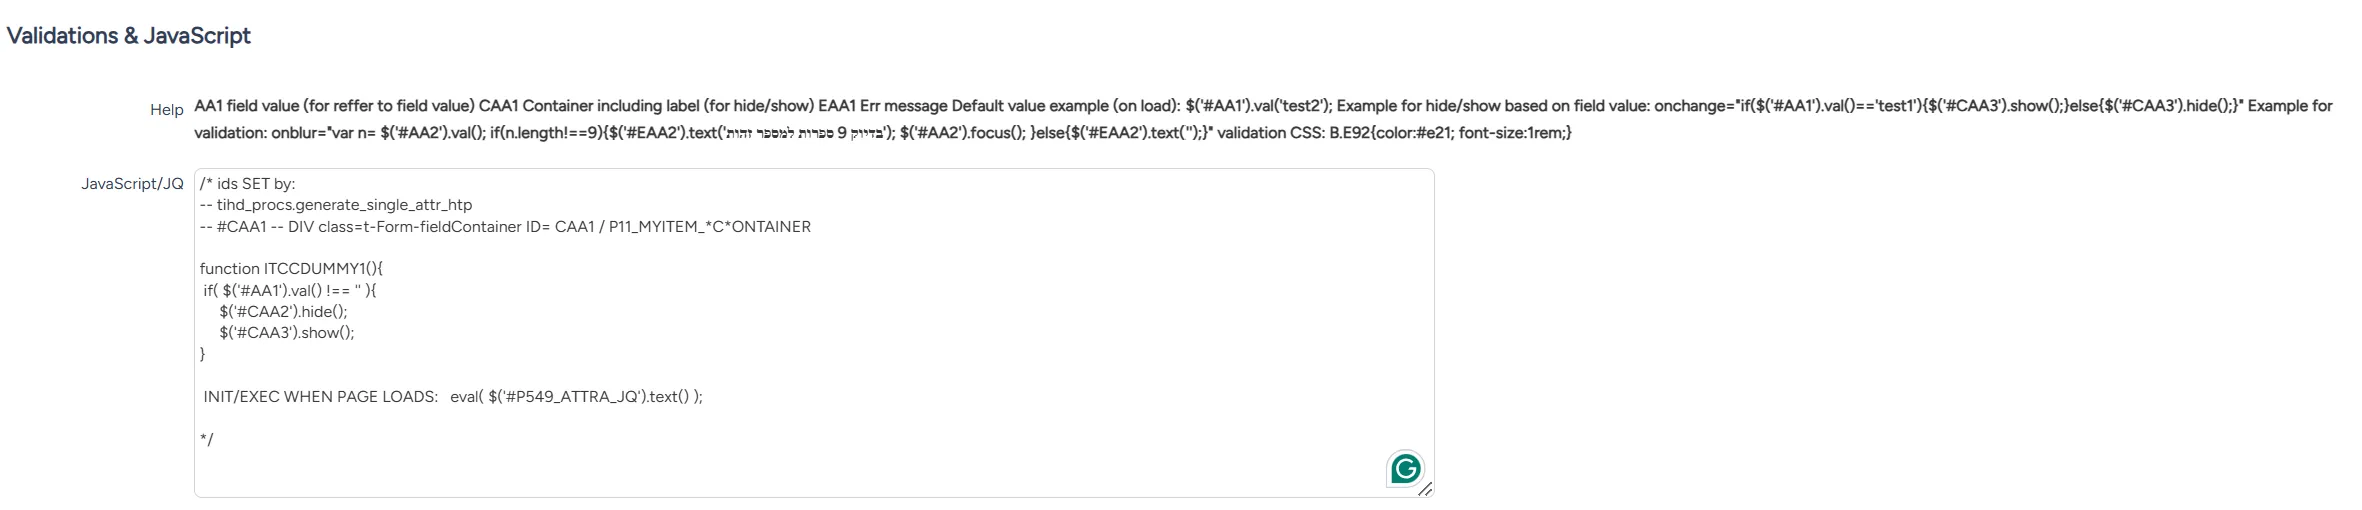
Enter or edit the SQL expression that will take place upon creation into the Create Validation SQL Expression textbox.

Enter or edit the SQL expression that will take place upon update into the Update Validation SQL Expression textbox.

At the bottom right of the page, select Save.
Validations
Validations ensure that the values entered into the attribute fields are valid and within the acceptable range of values. If a user enters an invalid value for an attribute, an error message is displayed. The ticket cannot be saved until the user enters valid data and the error is resolved.
For example, if a ticket requires the user to enter the date of the last data backup, the following validation code can check that the date entered is not in the future.
If the date is a future date, an error message is displayed.
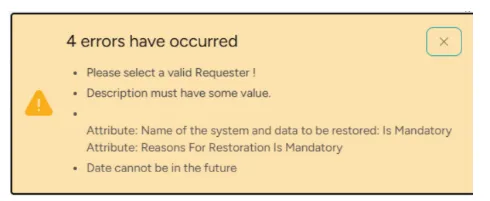
A validation can take place upon creation or upon update of the ticket. Validation upon creation requires the requester to enter valid values into the ticket. Validation upon update requires agents processing the ticket to enter valid data.
Sometimes, you may want to allow greater flexibility to the requester and require greater accuracy from the agents. In that case, you can use only validation upon update. In other cases, you may require accurate values from both. In that case, you can include validations both upon creation and upon update in your ticket form.

Understanding #FXX# Attribute Syntax
Each form attribute has an internal field number. To reference its value inside SQL, use the format:
Where:
- F = Field
- XX = Attribute number (01, 02, 03, …)
Examples:
Attribute | SQL Reference |
|---|---|
Attribute 1 | #F01# |
Attribute 8 | #F08# |
Attribute 15 | #F15# |
This syntax retrieves the runtime value the end user entered.
Referencing Page Items
In addition to attributes, you can reference page-level APEX items using:
Example:
Common usage:
- Identifying whether the page is Create vs Edit
- Validating values stored in hidden page items
- Reading system-level values relevant to the form
SQL Validation Structure
ITCC SQL validations follow a standard structure:
Guidelines:
- You may include one or multiple WHEN conditions.
- The first matched condition stops further evaluation.
- If no conditions are met, the CASE expression returns NULL, meaning the validation passed.
Example Structure
This template can be used as the base for most validation rules in forms.
SQL Validation Examples
Validation Type | SQL Example | Description |
|---|---|---|
Conditional Required | CASE WHEN #F10#='Yes' AND #F11# IS NULL THEN 'Field 11 required when Field 10 = Yes' END | Makes a field required based on another field’s value |
Compare Two Fields | CASE WHEN to_number(#F20#) > to_number(#F21#) THEN 'Start cannot be greater than End' END | Validates numeric order |
Value Not Allowed | CASE WHEN #F01# = 1 THEN 'Value 1 is not allowed' END | Blocks submission if a field contains a forbidden value |
Length Check | CASE WHEN LENGTH(#F05#) < 5 THEN 'Min 5 characters required' END | Ensures minimum text length |
Email Format | CASE WHEN NOT REGEXP_LIKE(#F08#, '^[^@\s]+@[^@\s]+\.[^@\s]+$') THEN 'Invalid email' END | Validates email structure |
At Least One of Two Fields Required | CASE WHEN #F04# IS NULL AND #F05# IS NULL THEN 'Field 4 or 5 must be provided' END | Validates optional-but-at-least-one scenarios |
LOV Value Exists | CASE WHEN #F09# IS NOT NULL AND NOT EXISTS (SELECT 1 FROM TITT_ALL_USERS WHERE EMAIL = #F09#) THEN 'Invalid Email' END | Verifies that an LOV selection matches real records |
Compare Two Date Fields | CASE WHEN to_date(#F01#,'DD-MON-YYYY')>to_date(#F02#,'DD-MON-YYYY') THEN 'Date can not be larger than the second date' END | Validates date order |
JavaScript
JavaScript is executed upon page load, whenever the ticket is opened.
You can use JavaScript to control the behavior of a ticket's fields.
Attribute Selectors
Each attribute has the following main elements:
Element 1: Attribute Container – #CAA#
Controls the full field area (label + input). Used for showing, hiding, enabling, disabling, and styling the entire field.
Example:
Element 2: Attribute Input – #AA#
Represents the value of the attribute. Used for reading values, setting values, detecting changes, and checking conditions.
Example:
Element 3: Attribute Message Area – #EAA#
Displays validation messages or additional text below the field.
Example:
JavaScript Locations in ITCC
ITCC supports the following JS execution points:
Point 1: Initialization JS (when page loads)
Used for:
- Hiding fields by default
- Setting placeholders
- Setting default values (only for Create pages)
- Preloading behaviors
Point 2: Attribute-Level JS (on change event)
Used when a change in an attribute triggers logic for other fields.
JS Examples
The following examples demonstrate the use of JavaScript.
- Hide fields on page load (Initialization JS):
- Show or hide fields based on another attribute (OnChange):
- Handling Checkboxes
Detect if a checkbox is checked:
- Multi-Select List – Check if Value Exists
- Setting Default Values
Default values should only be applied on ticket creation pages to avoid overriding database values in edit mode.
- Setting a Placeholder
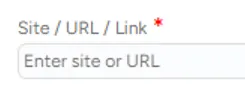
- Enable / Disable Attributes
- Clear a Field When a Condition Is Not Met
- Write an Error Message
- Conditional Logic Based on Multiple Conditions
⚠️ Important Note for Attribute-Level JavaScript:
When writing JavaScript inside an attribute’s JS (field-level JS) in ITCC, you must use an event handler to trigger your code.
Common events include:
- onchange: trigger when the user changes the value (e.g., text field, select, LOV)
- onkeyup: trigger after every key press (useful for live validation, like email format)
- onclick: trigger when a checkbox is clicked
Why this is necessary: Field-level JS runs in the context of the attribute, not the entire page. Without specifying an event, your code will not execute. Always attach your logic to the appropriate event.
JS Cheat Sheet
Purpose | jQuery Selector | Description | Example |
|---|---|---|---|
Attribute Container | #CAA# | Full field wrapper (label + input); used to hide/show fields | $('#CAA12') |
Attribute Input | #AA# | The value element; used for reading/writing values | $('#AA12').val(); |
Attribute Message Area | #EAA# | Area below field for errors/messages | $('#EAA12').text(''); |
Checkbox input | $('#AA#').is(':checked') | Detect if checked | $('#AA5').is(':checked') if (isChecked == true) { } else { } |
Page number | #pFlowStepId | Used to target Create/Edit pages separately | $('#pFlowStepId').val() == '171' |
Show field | .show() | Displays attribute container | $('#CAA5').show() |
Hide field | .hide() | Hides attribute container | $('#CAA5').hide() |
Set value | .val('X') | Sets a default or dynamic value | $('#AA3').val('Tel Aviv') |
Placeholder | .attr('placeholder','...') | Adds guidance to user | $('#AA1').attr('placeholder','Enter site') |
JS Validation Rules & Patterns Cheat Sheet
Validation Type | Pattern / Code Example |
|---|---|
Required Field | if (!$('#AA4').val()) { $('#EAA4').text('This field is required.'); } |
Required When Condition Met | if ($('#AA3').val() === 'Yes' && !$('#AA4').val()) { $('#EAA4').text('Please fill this field.'); } |
Positive Number Only | if (Number($('#AA6').val()) <= 0) { $('#EAA6').text('Value must be > 0.'); } |
Min/Max Length | if ($('#AA7').val().length < 5) { $('#EAA7').text('Minimum 5 characters required.'); } |
Multi-Select Required | let val=$('#AA11').val() |
Multi-Select Contains Specific Value | if (!val.includes('network')) { $('#EAA11').text('Value "network" must be selected.'); } |
Email Format | let email = $('#AA1').val(); let p = /^[^\s@]+@[^\s@]+\.[^\s@]+$/; if (!p.test(email)) { $('#EAA1').text('Invalid email.'); } else { $('#EAA1').text(''); } |
Checkbox Required | if (!$('#AA13').is(':checked')) { $('#EAA13').text('Required.'); } |
Validate Only If Field Is Visible | if ($('#CAA14').is(':visible') && !$('#AA14').val()) { $('#EAA14').text('Please fill this field.'); } |
Reset Dependent Field | if ($('#AA15').val()!=='Other'){ $('#AA16').val(''); $('#EAA16').text(''); } |
Confirm Value on Change | $('#AA20').on('change', function(){ if($(this).val()&& !confirm('Are you sure?')){ $(this).val(''); }}); |
Deleting validations and JavaScript
You can delete validations and JavaScript at any time.
To delete validations and JavaScript:
From the tabs at the top, select Validations and JavaScript.

Delete the validations and JavaScript from their corresponding textboxes.
At the bottom right of the page, select Save.