Users
What are users and how are they classified? User overview
How can I add a new or edit an existing user? Adding or editing one user
How can I add multiple users from a spreadsheet? Adding multiple users from a spreadsheet
How can I reset a user's password? Resetting an existing user's password
How do I add a user to a group? Adding a member to a group or editing a member's settings
How do I add a user to a role? Adding a user to a role
User overview
Everyone using the ITCC system needs to be set up as a user. Users can be created locally or synchronized from an enterprise identity provider, such as Active Directory.
Each user is classified as End User or Non-End User. When users are synchronized from an enterprise identity provider, by default, they are created as End Users.
In addition, ITCC offers several ways to classify users:
- (Mandatory) Support Levels/Login Types (for example, Tier-1, Tier-2, Management, etc.)
- User Types (for example, employee, customer, etc.)
- Roles (for example, system administrator, assets administrator, etc.)
- Groups (for example, help desk, technicians, etc.)
Support levels and user types can be chosen when adding a new user. Each user has only one support level and one user type.

A user can have multiple Roles.
A user can belong to multiple Groups.
You can add users to the system one at a time or upload multiple users from a spreadsheet. You can also sync users from Active Directory.
Setting up system users
When not using enterprise identity providers, you can set up users as follows at any time.
To set up system users:
On the left side menu, select Administration.
In the search bar under Search for Admin Configuration Options, type Users and select the Users option that appears.
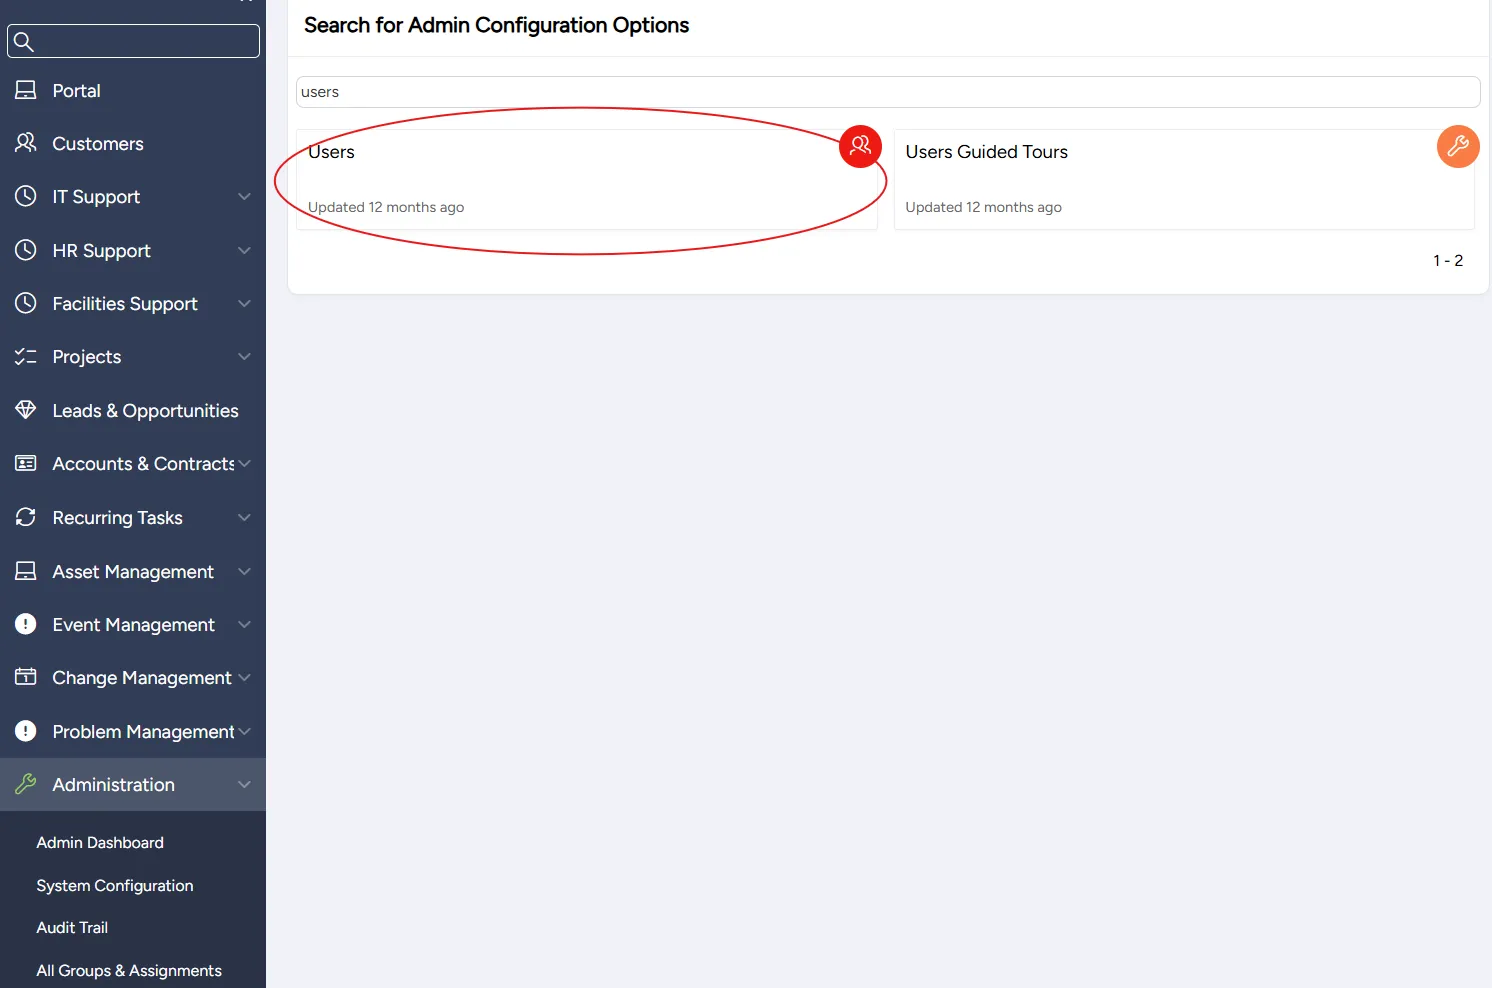
From the Users page, you can:
Adding or editing one user
You can add or edit users at any time.
You can add or edit multiple users at the same time with the Adding users from a spreadsheet functionality.
You can also add or edit one user at a time.
To add or edit one user:
On the Users page:
- To add a new user: select Add
- To edit an existing user: search for or scroll down to the row of the user you want to edit and select the Edit icon

On the User page that opens, enter or edit the user's settings (most fields are optional; mandatory fields are marked as such):
Field | Description | Default value |
|---|---|---|
User name | (Mandatory) Enter a unique user name by which the user will be identified by the system | |
(Mandatory) Select the level of support the user provides, such as end user, manager, Tier-1, etc. | | |
User type | Select user type | |
Status | (Mandatory) Select user's current status out of the following:
| Active |
Expires on | If this user is temporary, select the date when the user becomes inactive | |
End User Type | If this is an end user, select if the user is:
| |
First name | (Mandatory) Enter user's first name | |
Middle name | Enter user's middle name | |
Last name | (Mandatory) Enter user's last name | |
Enter user's email address | | |
Supervisor | If the user is an employee, select their supervisor | |
User VP | If the user is an employee, select the Vice President of their department | |
Job title | If the user is an employee, enter their job title | |
Department | If the user is an employee, enter their department | |
Preferred method for notification | Select user's preferred method of communication, such as email or cell phone; when selected, the preferred method will be displayed in user's tickets | |
Cell phone | Enter user's cell phone number | |
Office phone | Enter user's office phone number | |
Office extension | Enter user's office phone extension | |
User site | If your organization has multiple sites, enter this user's site | |
Organization | (Mandatory) Select the organization the user is associated with | The main organization using the ITCC system |
Employee code | If your organization uses employee codes, enter this employee's code | |
Country | Select user's country | |
City | Enter user's city | |
State | Enter user's state, if applicable | |
Default location type | Select user's default location type | |
Location1 | Enter the first line of the user's address | |
Location2 | Enter the second line of the user's address | |
Location3 | Enter the third line of the user's address | |
Location4 | Enter the fourth line of the user's address | |
Email2 | Enter an additional email address | |
VIP flag | Select if user is a VIP; this information will be reflected in tickets | |
Default severity | Select default severity for this user | |
Default urgency | Select default urgency for this user | |
Default impact | Select default impact for this user | |
Default Language | Select user's default language | |
Timezone | Select user's timezone | |
Limited | (For agents only) If needed, select the support levels accessible to this user, such as same tier or higher tiers | |
Attachment | Choose and upload the file with the user's photo | |
User Color | Select the color displayed in user's profile and working lists | |
Enable API access | Select to enable API access | |
Azure AD ID | (Read-only) When syncing users from Azure Active Directory, displays user's Active Directory ID | |
In the upper right corner, select:
- Add when adding a new user
- Save when editing an existing user
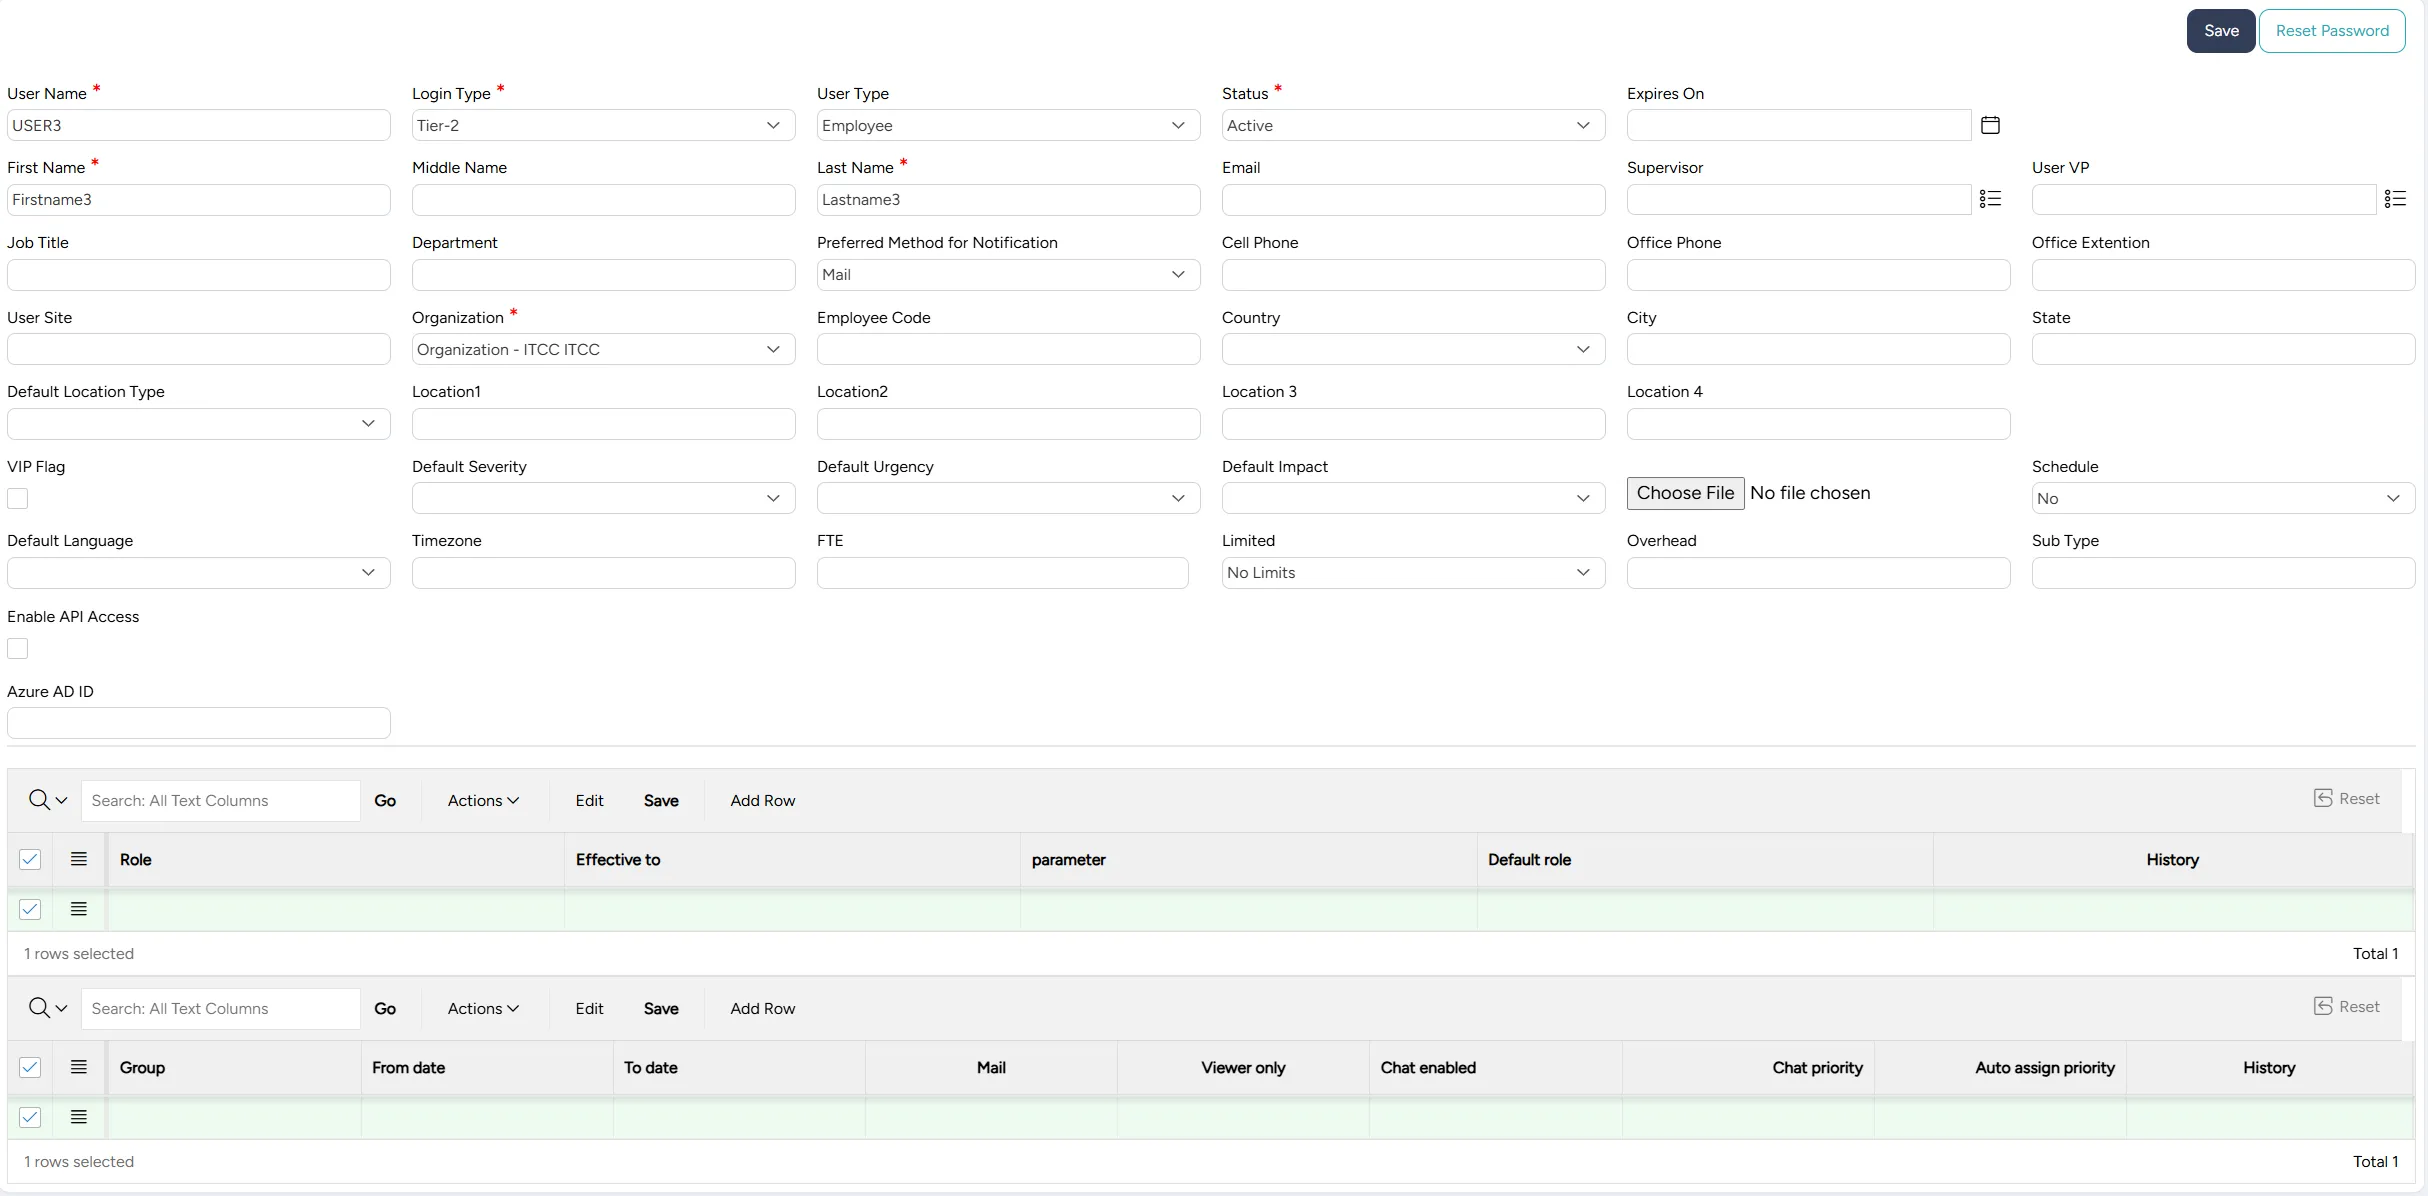
(For local authentication) To set or reset the user's password:
- Select Reset Password in the upper right corner.
- On the Reset Password page that appears, enter the new password in the Enter New Password field and Re-Enter the New Password field.
- To save the new password, select Reset Password. To cancel, select Cancel/Back.

Select Save.
Adding multiple users from a spreadsheet
You can add multiple users to the system by uploading a spreadsheet file containing the users' information.
The following file types are supported:
- Excel
- CSV
- TSV
You can download a template to help you prepare your spreadsheet in the required format.
To upload multiple users:
On the Users page, in the upper right corner, select Upload.

On the Upload Users page that opens, if you need assistance with the spreadsheet format, select Download Template. The template spreadsheet downloads to your computer. On the template, to update an existing user, keep the user's user_id; to create a new user, leave the user_id field empty.

When the spreadsheet with your user data is ready, select Choose File and choose your spreadsheet.

To clear the selection and select a different file, choose Refresh.

Select Load File. The file uploads. If any of the entries in the file are invalid, an error message appears.

Select Process Valid Records. The records are processed, and your user list is updated.

Resetting an existing user's password
ITCC offers the following authentication options:
- SSO: single sign on, available for internal users; this is the preferred option
- user name and password: available for both internal and external users
When using user name and password, you can reset any existing user's password at any time, as follows:
To reset an existing user's password:
On the Users page, scroll down the row of the user you want to edit and select the Edit icon:

On the User page that opens, in the upper right corner, select Reset Password.

On the Reset Password page that appears, enter the new password in the Enter New Password field and Re-Enter the New Password field.

Select Reset Password.
Disabling a user
You can disable an existing user at any time.
To disable an existing user:
On the Users page, scroll down the row of the user you want to edit and select the Edit icon:
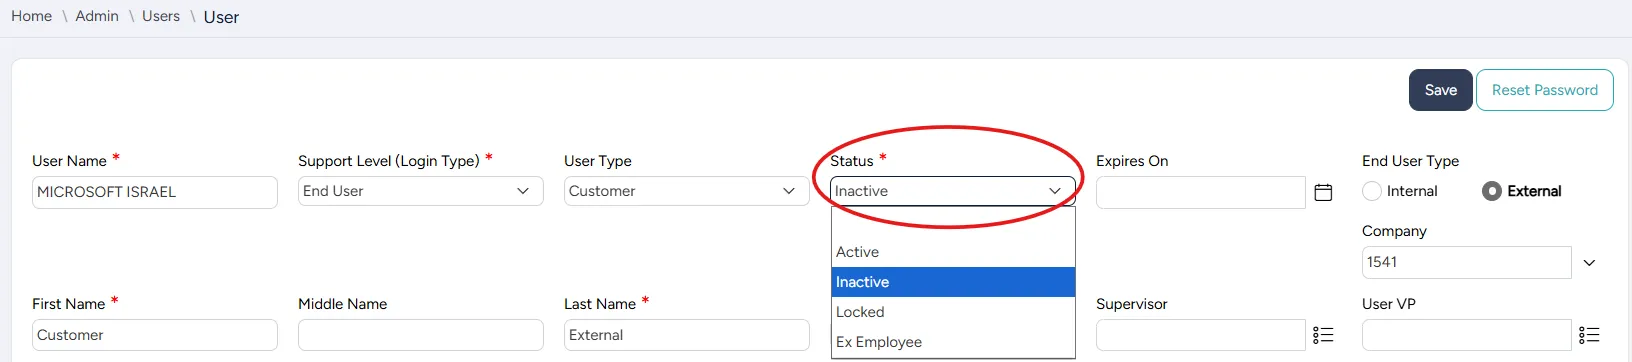
On the User page that appears:
- to disable the user immediately: in the Status dropdown list, select Inactive
- to disable the user at a later date: In the Expires On field, select the date by which you want to disable the user
Select Save.