Defining Change Call Types
Step 1: Planning the Change Management Process
Before configuring change tickets in the IT Care Center, consider your organization's change management workflow. Here are key questions to help you define the process:
- Who is authorized to create a change request? Identify the roles (e.g., end-users, managers, IT staff) that are allowed to initiate change requests.
- Does a change administrator need to review or approve the request? Determine if initial approval is required before moving forward with the change process.
- Is additional approval needed before the CAB (Change Advisory Board) meeting? Consider if other stakeholders, such as system owners, must approve changes prior to CAB discussions.
- How will changes be reviewed and implemented? Decide on the review, approval, and implementation steps required for different change types (e.g., normal, standard, or emergency).
Step 2: Enabling Change Ticket Types
- Navigate to Call Type Setup: Go to Administration > Setup Call Types.
- Search for Change Types:
- Enter “Change” in the search bar.
- Check the “Show Inactive” checkbox.
- Click the Search button.
- Activate the Required Change Type:
- Locate the change type you want to enable (e.g., "Normal Change").
- Enable it by selecting the “Active” checkbox next to the row and Save the changes.
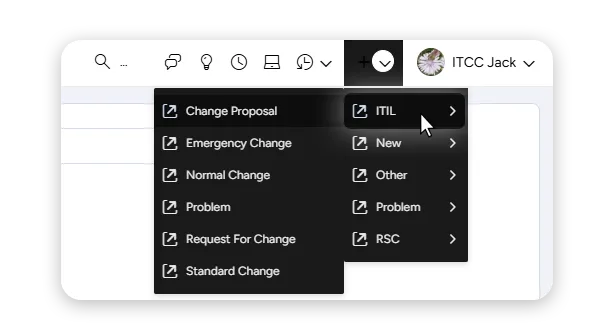
- The activated call type will now be available under the “+” icon next to your user profile, categorized under a folder named ITIL.
Step 3: Customizing Change Fields
To customize the fields displayed for a change ticket:
- Click the paper icon (in the “Fields” column) or the gear icon (in the “Setup” column) next to the relevant change type.
- Adjust the following fields:
Field | Form / Setup | Description |
|---|---|---|
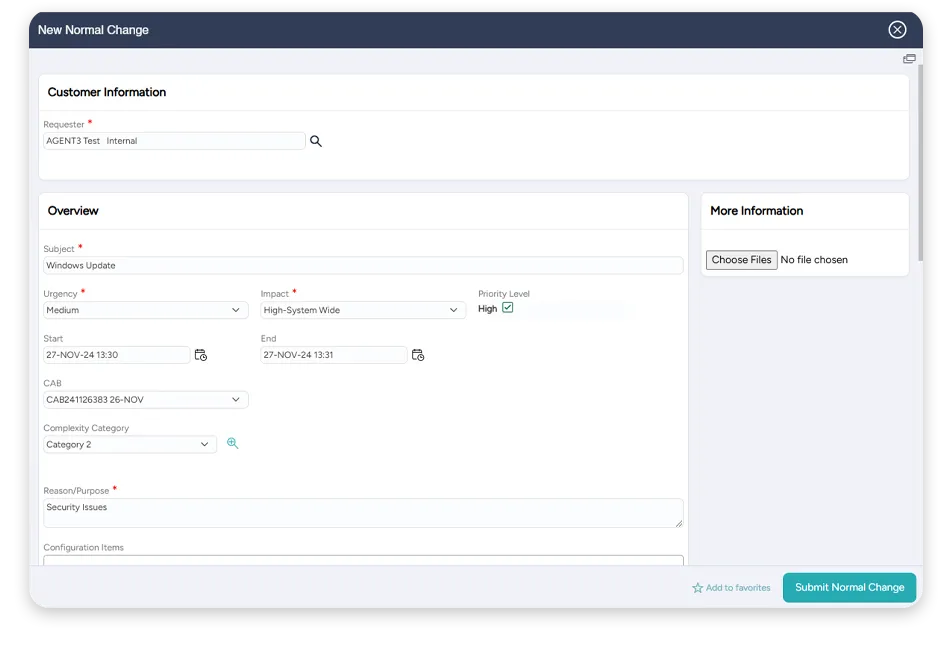
Requestor | Setup | Optionally, modify the customer label (Field name: “Customer Label”). |
Subject | Setup | Optionally, modify the subject label (Field name: “Subject Title”). |
Urgency | Setup |
If needed, modify the urgency values |
Impact | Setup |
If needed, modify the impact values |
Priority Level | Setup | Enable/disable the automatic calculation via the "Severity Calculation" checkbox. |
Start Date | Setup | Configure visibility/mandatory status via the “Plan Start Date” field. |
End Date | Setup | Configure visibility/mandatory status via the “Plan End Date” field. |
CAB | Setup | Enable/disable the "CAB" field using the “Display CAB” checkbox. |
Complexity Category | Setup | Customize the label through the “Sub Category Name” field. |
Reason/Purpose | Setup | Enable the Reason/Purpose checkbox. |
Configuration Items | Setup | Enable/disable the "Configuration Items" field using the “Configuration Items” checkbox. |
Downtime & Duration | Setup | Activate using the "Downtime" and "Downtime Duration" checkboxes. |
Risk Assessment | Setup | Link a risk matrix through the “Risk Matrix” field. If needed, modify the risk matrix / create a new one. |
Related Incidents | Setup | Enable/disable the "Related Incidents" field using the “Related Incidents” checkbox. |
Related Problems | Setup | Enable/disable the "Related Problems" field using the “Related Problems” checkbox. |
Related Changes | Setup | Enable/disable the "Related Changes" field using the “Related Changes” checkbox. |
Test Plan | Form | Form defined field. |
Implementation Plan | Form | Form defined field. |
Rollback Plan | Form | Form defined field. |
Implementer Groups | Form | Form defined field. |
Change Summary | Setup | Form defined field. |
Step 4: Setting Up the Risk Matrix
- Use the default change risk matrix or create a new one under Administration > Risk Matrix.
- To modify risk labels, access the risk matrix settings and adjust as needed.
Step 5: Defining Configuration Items (CIs)
To classify assets as Configuration Items (CIs):
- Go to Asset List.
- Select the relevant asset and check the “Configuration Item” checkbox.
If the checkbox isn’t available, enable it via Administration > Asset Types & Attributes. Access the relevant asset type configuration and check “Configuration Item”.
Step 6: Managing Change Groups
If necessary, add new support groups for managing change entities through Administration > Groups.
Step 7: Adjusting Urgency & Impact Settings
- Update values via Administration > Severities & Priorities.
- If necessary, modify the Urgency & Impact Matrix in Administration > Defaulting Options, searching for ITCC_DEF_SEVERITY.
Step 8: Configuring Change Workflows
- IT Care Center provides predefined workflows for different change types (Normal, Standard, Emergency).
- To customize:
- Access Administration > Workflows.
- Search for “Change” and click “Go” to see predefined workflows for the different change entities.
- Adjust steps, assignees, groups, and approvers as needed.
- Set workflow launch rules to associate workflows with change call types via Administration > Workflow Launch Rules.
IT Care Center’s predefined workflows are already linked to predefined change types. Modify or delete default launch rules if necessary.
Step 9: CAB Email Template Setup
After setting up CAB meetings, adjust the CAB email templates:
- Go to Change Management > CAB Meetings.
- Open a CAB, and click the mail icon at the bottom.
- Click on the gear icon
- Edit the TABLE and FLAT ROW email formats.
Step 10: Add "Change" Permissions
To grant access to the Change Management menu item, follow these steps:
- Navigate to Roles Setup: Go to Administration > Roles.
- Search for and select the "Change" role.
- Add the users who require access to change management by including them in this role.
- Save the changes.
- User Re-login Required: Inform the users that they must log out and log back in for the permissions to take effect.